How to Clean Cast Iron Grill Easily: Banish Dirt Forever

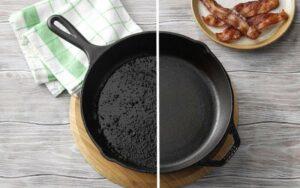
If you went out and purchased a pricey cast iron grill pan without much research, you likely had no idea how to maintain it. While cast iron cookware is well-loved and praised by professionals and home cooks alike, it isn’t easy to deal with.

So if you messed up your cast iron cookware, whether it’s the classic cast iron skillet or a cast iron grill pan, you’ve come to the right place. This article will show you how to clean cast iron grill pans and utensils easily. You can even use these methods to clean cast iron grill grates!

Besides showing how to clean your cast iron cooking pans, you will also learn how to season and maintain your cast iron grill pan/skillet to keep it in great shape for much longer.

So without further ado, let’s look at how you can clean your cast iron cookware!

The Best Ways to Clean a Cast Iron Grill Pan

how to clean cast iron grill

Because cast iron has a seasoned surface, it is very important to make sure that the cleaning process doesn’t damage this protective coating. If this layer is scratched off, the pan loses its nonstick surface and will need to be seasoned intensively, which is labor and time-consuming.

Instead, work gently and use substances that are very mildly abrasive to remove the gunk and debris from your cast iron grill pan. Although the process may take longer, it is worth it as it will be better for your cookware in the long run.

Here’s what you will need:

  • Salt
  • Dish detergent
  • Hot/Boiling water
  • Spatula
  • A soft cloth or dish sponge

Cleaning a Cast Iron Grill Pan with Just Hot Water:

This is the gentlest and most effective way to remove small bits of burnt food, grease, and debris from your pan. It is also particularly useful for pans with tall sides. All it needs is a little elbow grease.

Instructions:

  1. Boil some water in your grill pan on the stovetop. The water needs to be 2-3 inches in depth.
  2. Once the water starts to boil, the bits of food and debris will gradually loosen up and rise to the water surface.
  3. Use a spatula to gently scrape larger or more stubborn bits of debris stuck to the pan.
  4. Then, allow your grill pan to cool and drain the water and debris/residue into your sink.
  5. Once the cast iron pan is emptied out, rinse it with clean hot water and then dry it off with a soft dish towel.

Cleaning a Cast Iron Grill Pan with Just Salt:

Grill Pan cleaning Salt

Many cooks prefer a ‘dry’ method to clean their cast iron cookware. The good news is that salt is mildly abrasive and can clean a slightly dirty cast iron pan on its own.

Instructions:

  1. Cover the pan’s surface with a thick layer of salt.
  2. Use a napkin or small dishcloth to gently scrub the cast iron grill pan with the salt. As you rub the surface, you will notice the salt dislodging the pieces of food and residue from cooking.
  3. Add more salt if needed, and keep scrubbing until all the burnt bits of food have been loosened from the pan surface.
  4. Discard the salt and use a clean cloth to remove the bits of salt and loosened debris in the pan, until it is completely cleaned.

Cleaning a Cast Iron Grill Pan with Salt and Hot Water:

If your cast iron grill pan is dirtier than expected, using salt and hot water together will work well to scrape bits of food without scratching the cast iron surface.

Instructions:

  1. After use, allow the cast iron pan to cool down a little.
  2. Once the pan is just warm, pour some coarse salt into the grill pan, making sure the entire surface is covered.
  3. Then, pour a small amount of hot water into the salt. This will turn the salt into a sort of paste.
  4. Use your dish sponge to scrub the salt-paste into the grill pan surface. Clean between the ridges, as well as the sides as these areas often have hardened residue.
  5. Once all the gunk is loosened up, rinse the salt mix and debris off with hot water, then dry with a kitchen towel or paper napkin.

Cleaning a Cast Iron Grill Pan with Soap and Water:

Cast Iron Grill Pan with Soap and Water

Using dish detergent and water may be the most common way to clean dirty cast iron grill cookware. It is also a good way to clean a pan that is dirty but doesn’t have stubborn bits of burnt food stuck to it.

However, harsh soaps can affect the seasoning of your pan, so use this method sparingly and make sure you use a very mild detergent.

Instructions:

  1. Start by adding a tiny amount of mild dish detergent in the middle of your grill pan.
  2. Then add a bit of hot water to the pan to make a lather.
  3. Use a soft scrubber or sponge to gently scrub the surface and sides of the cast iron pan.
  4. Once all the gunk has been cleaned off and the surface of the pan is smooth, rinse off thoroughly, making sure no soap remains in the pan.
  5. Dry completely with a dish towel or any other soft cloth.

Seasoning a Cast Iron Grill Pan

This is an important part of maintaining all kinds of cast iron cookware like griddles and pans. 

Even if you haven’t scratched your cast iron grill pan while cleaning, seasoning it afterward is still necessary. This will keep your pan in good shape for much longer, and make cooking in it absolutely pain-free.

Here’s the quick and easy way to season your cast iron pan:

  1. After cleaning your pan, dry it carefully with a towel or napkin.
  2. Then set it on the stovetop on high heat for a minute, until any lingering moisture has evaporated.
  3. Once the pan is cool enough to work with, use a paper towel to rub any kind of neutral oil (vegetable, sunflower seed, peanut) across the entire cooking surface, as well as the bottom of the pan. Don’t forget to oil the sides! This will also protect glass cooktops.
  4. Use another napkin to wipe off any excess oil. The whole pan just needs to be coated with a thin layer of oil.
  5. Then set the pan back onto the stove and heat until it starts smoking just a bit.
  6. Wait for the pan to cool down again before storing it in a dry place.

Removing Rust from a Cast Iron Grill Pan

Removing Rust from Grill Pan

If you’ve left your cast iron cookware in a damp space, and the coating has been compromised, rust will set in immediately. Here’s how you can fix all that:

Step One: Removing the Rust

First things first, get rid of the rust. There are two ways to do this: soaking and scrubbing.

You can either soak your pan in a bucket or sink filled with white vinegar diluted with an equal amount of water. The important thing to remember is that you need to remove the pan immediately after the rust dissolves and flakes away.

This is because the pan has no coating and the unseasoned surface will be totally rusted. This kind of rust can not be fixed so you need to be careful.

Or you can gently scrub the rust away with steel wool. While this is more labor-intensive, it is safer for your pan. You can also use soapy water. The important thing is to dry your pan completely afterward with a towel, or by placing it over medium heat on the stove.

Step Two: Season the Pan

Then re-season the pan from scratch. This takes more time than your regular seasoning.

Preheat your oven to 350˚F and place a large sheet of aluminum foil on the bottom rack. Rub a neutral oil all across the entire pan. Then, put the pan upside-down in the oven over the foil, as this will catch any oil drips.

Let the pan bake in the oven for an hour, cooling afterward for at least 45 minutes before using it. Make sure you dry your pan completely when cleaning, and season lightly as mentioned before to keep it working well.

To prevent rusting, store the cast iron cookware in a low-humidity environment. Always wipe it down with a bit of oil that has no taste and a high smoke point.

Maintaining Your Cast Iron Grill Pan

If you’ve been dealing with rust and other issues with your cast iron cookware, these tips will help avoid them in the future.

  • Avoid using soap or detergent as much as possible when cleaning your grill pan.
  • Avoid using metal utensils and stick to wooden or silicone spatulas and spoons.
  • Store your cast iron grill pan in a clean, cool, and dry place.
  • Don’t store any food in your pan, especially when cooking things like sauces that have tomatoes, vinegar, lemon juice, or other acidic ingredients.
  • Always keep your cast iron pan coated with a light layer of neutral oil.
  • Clean your cast iron pan immediately after each use, and do not leave it to soak overnight, as this encourages rusting.
  • Never use a steel wool scrubber to clean your pan after cooking-instead use a gentle scrubber or dish sponge to dislodge bits of food.

Frequently Asked Questions

Here you will find answers to questions we get asked the most about cast-iron grill pans.

01. Is Cast Iron Good for Grilling? 

Yes, grilling steaks on a cast iron pan will allow the meat to brown evenly, and will also contain any drippings from the meat, which adds more flavor.

02. Is It Healthy to Cook in Cast Iron?

Because you can steam, broil, and even ‘fry’ without oil in a well-seasoned cast-iron pan, it is a pretty healthy option to cook in.

03. What is a Cast Iron Grill Pan Good for?

These grill pans are best for grilling veggies, searing steaks, pork chops, and cuts of meat.

04. Why is Cast Iron Better for Grilling Steak?

Cast iron heats very evenly, which means the steak will be cooked uniformly with even browning. It also keeps the meat nice and juicy without drying out.

05. What are the Disadvantages of Cast Iron?

Cast iron cookware is a little tricky to use, as the seasoned surface needs maintenance and cannot be scratched off. You also need to be careful when cleaning and storing your pan.

06. Is Cast Iron Better Than Non-Stick?

Although cast iron is pricier than non-stick cookware, cast iron is better for cooking because it conducts heat more effectively and evenly than non-stick.

Also, the non-stick surface wears off over time and the pan will need replacing, while a cast iron pan can be re-seasoned and used for decades.

In Brief

While cast-iron seems scary for first-time cooks, it is one of the best investments for your kitchen. You can grill, fry, steam, and even bake in one of these, which makes it a great tool for cooking. 

Once you learn how to clean cast iron grill pans, you can maintain your cookware indefinitely, using it without damage. As you can see, cleaning the pan will just take a bit of extra effort and time. Once you get your pan nice and clean, you can cook almost anything out there. So what will it be? Will you use your pan to cook some burgers, or grill a mighty Tomahawk steak?

How to Use a Smoker Box: Smoke Food without a Smoker!

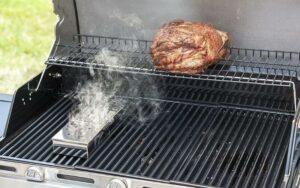
Do you love smoked meat? If you have an abundance of fresh meat, smoking them is a good method for storing and preserving it. Many people shy away from smoking because they do not own a complete smoker.

But this doesn’t mean you can’t smoke things at home. If you have a gas grill and a little ingenuity, you can smoke herbs, meat, veggies, spices, and even cheese! Many people own a smoker box for gas grills, but few know how to use it properly.

This article aims to change that. If you own a gas grill smoker box, you can smoke anything without much trouble. We’ll show you how easy it is to use them, and give you all the tips you need to smoke meat like a professional. If that sounds like an interesting deal, keep on reading!

What is a Smoker Box?

bbq smoker box

A smoker box is a small metal container that can be used on grills to infuse a smoky flavor into grilled or food cooked on indirect heat. Just fill it with pellets or soaked wood chips then place it under your grill grates. 

Smoker boxes are an inexpensive add-on to your grill, allowing you to easily smoke food without investing in a separate smoker.

Getting a cast-iron smoker box for gas grill will ensure that you can smoke meat for years to come. However, a Weber stainless steel smoker box can also get the job done. If you are out of options, you can even make a homemade smoker box for gas grills.

When grilling over charcoal briquettes, the smoker box is positioned right on the briquettes. Similarly, when used on gas or electric grills, the smoker box is placed directly on the heat source, under the grate on the grill.

Simply put, smoker boxes are used for providing a smoky flavor to grilled foods as they cook. They hold the soaked wood chips that are to be placed over a charcoal or gas fire for this flavor. Besides water, liquids like beer, soda, or juice can be used to infuse the wood chips with unique flavors.

Smoker boxes generally range in size from 8-12 inches long and 4-6 inches wide. If you don’t smoke large quantities frequently, we suggest getting a small smoker box. This is also a good option if you want to experiment with using a smoker box.

What are the Different Kinds of Smoker Boxes?

Before we get into using a smoker box, let’s have a quick peek at the kinds of smoker boxes out there. Whether you have a stainless-steel smoking box, a Weber grill smoking box, or a cast-iron one, knowing the sort of tool you have will help with your smoker setup.

Smoker Box Under-Grate:

This kind of smoker can be made from disposable aluminum foil or from stainless steel or cast iron that can be reused. They are meant for directly mounting between the flame diffusers under the gas grill grate.

Smoker boxes under-grate available nowadays come in a range of shapes and sizes: they may be flat, round, V-shaped, or tube-shaped. Because the smoker box is right under the grate, the result is a richer flavor and more intense smokiness.

Smoker Box Over-Grate:

Smoker boxes over-grate are typically rectangular; others may have flatter designs. This kind of box is mainly made from stainless steel like smoker boxes under-grate. They may also be found in the form of pouches, grids, and trays.

Disposable Smoker Box:

A disposable smoker box can only be used once because it is made of aluminum foil. You can make these yourself at home in the easiest way ever- make foil pans and aluminum foil lids and poke holes in them. 

You can also just use aluminum foil to create a box-like container and cover it with a foil lid if you don’t have foil pans at home.

Make sure that the holes in the lid are roughly the same shape and size so that the smoke is dispersed evenly. You can also use wood chips in these boxes so the smoke can pass directly through the burners.

Free-Standing Smoker Box:

The free-standing smoker box is very versatile and can be used on charcoal in a coal oven, burned directly on a furnace, or even used on a griddle. 

They are often made from stainless steel and sometimes cast iron. This kind of box can be much larger in size and uses up more pellets or wood chips per smoking session.

Most traditional rectangular smoker boxes can be pretty forgiving and you can use them both on the burner of the grill and under an actual grill. 

However, some models are specially designed for use under the grill. As a result, you can use some smoker boxes in different grill settings, which is super convenient.

How to Use a Smoker Box

how to use a smoker box

With the introductions out of the way let’s look at how to use a gas or propane grill with a smoker box. Whether you have a Weber Genesis smoker or a Napoleon smoker box, or anything else in between, this guide will work for you.

How to Use Smoker Boxes on a Gas Grill:

  1. Preheat your gas grill.
  2. Set up a smoker box or make a disposable one from aluminum foil.
  3. Then load your smoker box with soaked wood chips. We’ll talk about the best kinds of pellets to smoke wood chips on gas grills later.
  4. Set the smoker box over the burner you will leave on during indirect cooking. You can place it over or under the cooking grates.
  5. After the box starts smoking, set up the grill for indirect cooking by turning off all extra burners.
  6. Adjust the remaining lit burners until the internal temperature reaches anywhere from 220F-250F.
  7. Add the food to the grill and smoke the meat until it registers an internal temperature of 160F.

You might need to keep adding extra wood chips to the smoker box, whenever they stop producing smoke.

How to Use a BBQ Smoker Box:

You don’t have to be an expert at barbecuing to know how to use a smoker box for BBQs.

  1. Put your dry wood chips or pellets in the smoker box.
  2. Shut the lid properly. Don’t overload the box with wood chips, as this can prevent you from closing the lid properly.
  3. Set the smoker box above the grill, inside the smoking compartment. When using charcoal as fuel, place the smoker box right above the charcoal, under the open grill grate.
  4. Preheat your grill by turning it to a high temperature until the wood starts smoking; this takes around 10-15 minutes.
  5. Then, reduce the temperature to medium heat.
  6. Put in the meat you want to smoke above the grill in the smoking compartment, next to your smoker box.
  7. After the food has been sufficiently smoked and reaches 160F, kill the heat and open the smoking compartment.
  8. Put out the smoldering wood chips inside the smoker box.
  9. Remove the food and let it rest for 5-10 minutes.

Setting Up Your Smoker Box

​Place the wood chips in your smoker box. When using wood chips on gas grills, people soak their wood chips first to prevent them from catching fire.

If your smoker box doesn’t have holes on the bottom, the wood pellets won’t generally catch on fire, so you can use dry wood chips. Using dry chips can produce smoke much faster.

​Set the smoker box as close to the heat source as possible. When using a gas grill, this means placing it on top of the burners. If using charcoal, place it right on top of the charcoal.

We suggest turning your burners on the highest setting at first to get the smoker box hot enough to start producing smoke. It can take up to 10 minutes for the box depending on your grill.

​After the smoker box starts producing smoke, you can decrease your burners back to regular cooking temperatures. It will stay hot enough at that point to keep producing smoke for the rest of the cooking process.

Best Wood Chips for Your Smoker Box

Confused about the right wood chips on the gas grill? Here’s everything you need to know!

Almond: This wood adds a sweet hint to your meat, and works well for poultry, pork, and fish. It also creates less ash!

Apple:  It is pretty mild and has a subtle fruity flavor, and is slightly sweet. It is great with poultry and pork.

Cherry: Cherry wood adds a fruity sweet-and-tart flavor. It works well no matter what you are smoking and is considered the best wood for smoking.

Hickory: This is the ideal wood for a heavy smoky flavor. It is a great choice when smoking red meat, bacon, and ham.

Orange/Lemon/Grapefruit: The citrus notes work well with fish and white meat.

Oak: It is best for heavy-duty smoking like ribs, pork, and heavy game. It has a particularly intense smoke flavor.

Frequently Asked Questions

Below you’ll find answers to questions we get asked the most about smoker boxes.

01. What are the Steps on How to Use a Smoker Box on a Charcoal Grill?

Place your smoker box with wood pellets/chips above the charcoal, then light the charcoal on high until the wood starts smoking. Then, lower the heat to medium, add the food, and smoke until it reaches 160F.

02. What is a Smoker Attachment for Grill?

Some gas grills come with a smoker box as an accessory or attachment. This is convenient as you know that the smoker box is perfectly compatible with your grill.

03. What is the Best Method for Using a Gas Grill as a Smoker?

Place the smoker directly over the burner that will be lit throughout the smoking process. Put the cooking grates in place.

Turn on the grill, and set all the burners to high, and close the lid. When smoke appears, set your food on the grates, lower the temperature of the grill, or turn off the extra burners as needed.

04. What is the Best Wood for Smoking Meat?

A combination of pecan, oak, or hickory with cherry or applewood will give you the best results when smoking meat. The best wood to use also depends on the kind of meat you are smoking.

Final Say

Smoking meat at home can take your culinary exploits to the next level. Whether you have a dedicated smoker, a smoker box attachment, or even a DIY box made from foil, you can make beautifully smoked meat with complex flavor right at home. Now that you know how to use a smoker box, you can experiment with various meats, wood chips, and smoking methods. To learn more about smoking meat on gas grills, check this out.

How to Put Out Charcoal Grill: Wrap It Up with No Fuss!

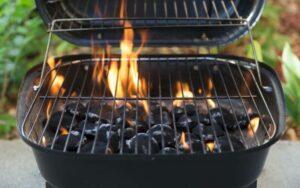
Grilling with charcoal is always an amazing experience, and this kind of grilling infuses the food with an intense smoky taste. Using charcoal grill and accessories requires a bit of finesse and grilling itself is a culinary art.

Most beginners get the hang of lighting a charcoal fire pretty easily. The process of grilling meat isn’t overly complicated either. But what about putting out a charcoal grill? Many guides gloss over this part of grilling, so grill amateurs aren’t sure how to put out charcoal grills.

However, knowing how to handle a grill after you are done using it is extremely important. You should extinguish your embers/charcoal as soon as possible as this saves fuel and also prevents accidents from flare-ups.

Also, if you have small children or pets, it is important to put out your grill right away. If you fumble around with your grill once the BBQ is winding down, you can be risking a fire hazard.

This article will change that. If you just got a BBQ charcoal grill, and you aren’t sure how to deal with the aftermath, keep reading. We cover everything; from putting out your charcoal grill to cleaning up the ash and debris.

How to Put Out a Charcoal Grill

how to put out charcoal grill

The easiest way to turn off your grill is to close all the vents, cutting off the oxygen supply to the burning coals. This method is a little slower, and it can take up to 2 days to let the coals cool down completely.

Putting out the grill with water is a little risky, but much faster. To completely put out charcoal, you need a bit of expertise in handling them. We’ll walk you through extinguishing barbecue grill charcoal.

What You Need:

Putting Out the Grill:

  1. Start by putting on heat proof oven mitts or BBQ gloves and make sure that they are heat resistant so that the heat from the grill won’t burn you.
  2. Take the rack off your grill and carefully close the lid. If your grill has vents then make sure that they are closed all the way to cut off the oxygen supply.
  3. Charcoal for the grill can always take a very long time to cool down, and it can be difficult to tell whether they’re still burning or not.

    Because of this, it is best to leave the coals to cool down for around 48 hours, just to make sure that they are completely cool.

Ash Disposal:

After this time has passed, and the contents of the grill have cooled down, you can start cleaning up the ash and remnants of the burnt charcoal.

  1. Use something like an ash removal bucket to safely scoop up the ashes. Pour them onto a large sheet of aluminum foil before disposing of them, as this prevents the ash from spilling and making a mess.
  2. Carefully fold up the foil, sealing the ashes inside securely. Dispose of the foil and ashes in a large metal basket or trash can. Avoid using plastic, as any remaining embers can burn it.
  3. When handling the ash and aluminum, wear gloves and use tongs. Even though the ash is mostly cold, it is safer to make sure any sparks or glowing embers won’t burn you.
  4. However, you don’t always have to wait for the charcoal briquettes to cool down completely. You can still remove them with the ash while they are still warm using a pair of sturdy tongs.

    However, in doing so, you need to use separate metal trash cans or containers; one for the ash and one for the charcoal.
  5. If the coals are still very hot, this means that they will keep burning in the metallic container and create more ashes. To extinguish them completely, use tongs to dip the burning coal into a large container or bucket of water.
  6. Do not spray or pour water onto the hot grill or charcoals. This can create flare-ups, and you can be injured by the jets of steam. The steam can also scatter the hot ash which can result in serious burns.
  7. Furthermore, coals burn at very high temperatures, and spritzing them with water can result in a cracked grill.
  8. Always wait until the ash and coals have completely cooled down, even if it takes two whole days, to stay on the safe side.

Cleaning the Grill:

  1. Use a metal grill spatula or a trowel to brush off the remaining ash from the grill.
  2. Then, thoroughly clean out the chamber containing ash. Pay particular attention to the vents, as stray bits of ash can end up there, blocking the vents when you next use your grill.
  3. Use a wire brush and grill cleaner to thoroughly clean the grates and lower section of the grill. You can also clean the grates using just soap and water.
  4. After the grates are clean and dry, spray some silicone to lubricate them. The spray acts as an anti-rusting agent and improves the lifespan of your grill grates in the long run.

After they have completely cooled down, use a pair of tongs to place the cold charcoal briquettes back in the bottom half of your grill so that you can use them the next time you fire up your grill.

Tips for Shutting Down Your Grill

After cooking on a charcoal grill, you need to put out the embers right away. These tips will help you extinguish your grill safely and quickly.

  • Don’t ever put hot charcoal in plastic bins or garbage bags, as this can burn up and even start a fire if there is an ember.
  • Don’t move the grates around before they have completely cooled down.
  • Locate the vents on top and bottom of the grill and close them. This will gradually put out the burning coals.
  • Always keep a bucket of water nearby to douse any hot smoldering charcoal briquettes. Keeping a fire extinguisher in the immediate vicinity is also a good idea.
  • Even if you think the charcoal grill is not hot enough to cause burns, use gloves and tongs anyways. Even after 48 hours, some ash or remaining charcoal can still be very hot.

Frequently Asked Questions

Below you’ll find answers to questions we get asked the most about putting out charcoal grills.

01. What Do I Do with Charcoal after Grilling?

After you are done with putting out the grill and cleaning the ash, you can reuse partially burnt coals the next time. After putting them out with water and allowing them to cool, let them dry completely before putting them back in the grill.

02. How Should I Put Out a Grill Fire?

To put out a grill fire, close all the vents to cut off the fire’s oxygen supply. This will slowly choke out the fire and eventually put it out.

03. Can You Reuse Charcoal?

After the charcoal is used or partially burned, it can be lit again after it has cooled and dried.

04. How Long Does Charcoal Burn for?

Lump charcoal generally burns for 4-6 hours, while briquettes will give you a good 8-10 hours. However, every BBQ grill is different and these burn times are dependent on the grill, and the airflow of the vents. If the vents are completely open, they will burn more intensely.

05. At What Temperature Does Charcoal Burn?

Charcoal burns at extremely hot temperatures. Charcoal burns at temperatures over 1,100 degrees Celsius (2,010 degrees Fahrenheit). This makes it even more vital to be careful around burning charcoal.

06. How Do I Get Rid of Charcoal Ash?

Let the ashes fully cool down or pour plenty of water onto them and stir thoroughly to speed up the process. Once the ashes have cooled completely, use a trowel to remove them from the grill.

Wrap them in aluminum foil or put them in a small metal container, like a coffee can. Then dispose of the ashes in an outdoor or metal garbage bin.

Conclusion

The best way to enjoy a BBQ is to use the grill properly and safely. Once you know how to put out a charcoal grill, you will be able to put a wrap on your cookout safely and quickly.

The key to handling a hot grill is patience; just shut off the vents and let science do the rest! Give the grill, charcoal, and ash time to cool off so you can handle them more safely.

What do you think? Are you going to follow this method after your next BBQ?

How to Turn on a Grill (Both Automatic and Manual)

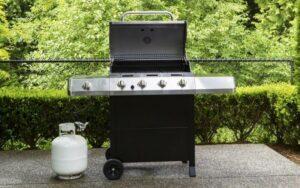
Nowadays, we all are upgrading to propane grills from our beloved charcoal grills. While charcoal grills have their place, gas grills are just easier to use on a regular basis. 

Not only gas grills save a lot of time and energy, but they are also healthier for our body and cause less greenhouse emission. We know, turning a propane grill is not that tough either. 

But if you are here, that means it’s your first time using a gas grill and you need an easy guideline. So here we are with two different methods to turn on your grill within minutes.

You may also like: How to start a traeger grill for the first time

How to Start a Propane Grill

how to turn on a grill

Although gas grills are fairly easy to use, we all face one of those moments where it is just not turning on. And the fact that there are so many different models with different features can make it a little bit confusing for a beginner. 

No worries, as we are going to mention all the different methods there are to turn on your propane grill. If your grill ever troubleshoots and the gas grill does not ignite, check if you are doing it right in the first place.

Using the Ignition System:

Ignition System

This is basically the default way you are supposed to start your gas grill. When this method does not work, we have to look for alternatives. Here’s how to turn on your grill using the ignition system for the first time:

01. Open the Lid:

Before you start doing anything else, open the lid of your gas grill. If you accidentally turn on the gas without opening the lid, there can be serious fire hazards as gas tends to explode in closed environments. So whether you have a grill with lid open or closed, knowing this is a good thing.

This is because gas fumes tend to gather in enclosed areas. When you lit up the grill, all the gas inside the lid will just fire up and cause an explosion. It is very dangerous. So do this step first.

02. Supply the Gas:

If you are using propane gas for your grill, you need to make sure that there is actually enough gas available to use. For first time users, you will have to set up the propane tank as well. As most of the propane grills are easy to carry, you won’t have too much trouble setting it up. 

Hook up the gas tank to the grill following the guideline mentioned in the propane tank. Follow the cautions carefully as fully loaded gas tanks need extra attention to handle. But this is just something you have to do once every month, depending on how much you use your grill.

For built-in grills with a main gas supply, there is no worry of replacing propane tanks. You just have to set it up once and forget about it. 

03. Turn on the Gas Supply:

After making sure the gas connection is properly set up, you can turn on the supply of it. For propane grills, turn your knob either clockwise or counterclockwise. Then wait 15 seconds to let the gas run through the system.

04. Ignite the Grill:

This is the fun part. Now you can ignite the grill by pushing the ignition button. After doing so, your grill will light itself up. Most propane grills have the same system for automatic ignition. You will find the button just beside the gas knobs. 

And there you have it. It’s that easy to turn on a gas grill with an automatic ignition system. In the next part, we will talk about what to do if you don’t have it!

Do It Manually:

turn on a grill Manually

Maybe your grill does not have an automatic ignition or it simply is not working properly. This does not mean you can grill your favorite food on it! Here’s how to turn on a grill manually:

01. Find the Lighting Hole:

The first thing you need to do is find the lighting hole. The lighting hole is usually on the grill’s exterior. You can not light up your grill like a regular gas stove. 

If you can not find this exact lighting place, do not try to toss a matchstick inside the open grill. So look for it thoroughly or check the instruction manual to easily find it.

02. Grab Your Matchbox:

Now that you have found where you have to light it up, grab your matchbox and fix it on the curled holder. This helps to keep your hand at a distance. Sudden flame exposure can burn your fingers so taking careful measures like this are crucial. 

The curled holder also helps to put the light exactly where you want. As most automatic grills are not meant to be used manually, the design is not very user-friendly. 

So the narrow holder helps to easily enter the match inside the hole. Without this, you will end up wasting a lot of good matchsticks. 

03. Light It Up:

After you have successfully set up your match into the holder, it’s time to light up your grill. Make sure to turn on the burner before doing so. 

After one burner is ignited, you can go and turn on all the other burners. This process is basically the same for both manual grills and grills with a broken automatic ignition system.

You may also like: How to keep a charcoal grill lit

How to Tell If Your Grill Has Issues

Your Grill Has Issues
  • If it has a hissing sound when you turn it on. This can be a sign of gas leakage.
  • If the ignition and gas supply has no problems but your grill still won’t turn on, then your burner needs to be replaced.
  • For a colder environment, you might be experiencing a slow gas supply. Cold can freeze parts of propane and reduce the gas flow.
  • If your rubber pipe feels rigid, they need to be replaced immediately. Long term use makes rubber lose its flexibility.

Maintenance Tips for Gas Grills

Maintenance Tips for Gas Grills

As gas grills are not cheap to own, taking proper care is a must. Here are some of our favorite tips to maintain the quality of your grill for years:

  • Do routine checkups with soapy water to know if there are any gas leaks. Running soapy water once a month through the pipes is a very smart idea to look for holes.
  • Always cover your grill. Keep the lid on when you are not using it. Put a durable, high-quality grill cover on top to make sure it doesn’t get corrosion or rust. This protects your grill from weather damage. 
  • Clean your grill after each use. This is very important to keep it looking brand new.
  • Do a thorough cleaning once a month. 
  • Season your grill grades to get a non-stick finish and rust-free experience.  You don’t have to do it for stainless steel or ceramic-coated grated. 
  • Regularly check fuel levels.

Frequently Asked Questions 

01. Why is My Weber Grill Not Lighting Up?

If you are having trouble with turning on your Weber grill, the problem probably is in the ignition system. So the first thing you should do is check the system to make sure all the wires are connected to the right place. You can plug and unplug all the wires to make sure they are in their respective places. 

If this does not work, you can manually light up Weber grill by using a matchstick. Of course, this is a temporary solution. You can replace the ignition system by contacting the manufacturer using your warranty.

02. How to Fix Low Flame on Gas Grill?

Low flame issues on a gas grill is a very common problem. To fix it, you can start by turning everything off. This includes the gas flow at the tank. After that, disconnect the regulator from your gas tank. 

Let the whole grill sit like that for 5-10 minutes. Then set everything up again and slowly open the valve all the way, wait for 40 seconds, and then light up your grill. You will find your grill to have an increased flame.

03. How Do I Unclog a Gas Grill Line?

You can unclog your gas grill line using a thin and sturdy wire. The wire needs to be longer than the line you want to clean. Then push it gently through the line and remove whatever is stuck inside it. This will unclog it and let the gas run through seamlessly again.

04. How Do I Light Up My Grill if the Ignitor is Broken?

It is a very common problem to happen. You can definitely use other things to light up your grill. To light up your grill without an ignitor, first, open the grill and find the lighting hole on its side. 

Then light up a matchstick and put it in the curled end of the holder. You can also use a lighter to light up a piece of paper and use it the same way as the matchstick. Once the fire is closer to the hole, turn on your gas burner. And voila! Your grill is ready to use. 

Wrap Up

Now that you know how to turn on your gas grill, go and start making your favorite hamburgers and wings. Whatever you do, make sure to keep it clean and pristine. 

If you can not turn on your grill even after following all those steps, it’s time to consult some professionals as you will likely have to replace some inside parts. 

With proper care, you can actually use your grill for years and years without any issues. So make sure to appreciate such a useful gadget for making mouthwatering dishes!

How to Grill a Tomahawk Steak: Make a Show-Stopping Meal!

You’ve tried steaks but have you ever had a Tomahawk steak cut? This may be the ultimate carnivore meal; a huge hunk of meat with a big bone handle. It even looks like caveman food and is aptly named Flintstone steak as well.

Or perhaps you know it as a cowboy steak. No matter what you call it, this cut of meat is something else. 

These steaks are huge and are at least 2 inches thick. Some of the bigger cuts can feed an entire family, although some people have attempted to eat it whole-and succeeded.

If you want to give a Tomahawk steak recipe a try, you might be a little intimidated. The huge chunk of meat can be pretty pricey and if you mess up, you waste a whole bunch of money and ruin a perfectly good dinner.

We’ve rounded up the best ways of cooking a tomahawk steak, even for beginners. This article will tell you how to grill a Tomahawk steak and make a meal fit for a king. Once you’re through, a tomahawk ribeye won’t seem so daunting!

What is a Tomahawk Steak?

Grill Tomahawk Steak

The tomahawk steak is a ribeye beef steak that is cut in such a way that there are at least five inches of rib bone left unbroken. This extra-long, French-trimmed bone uses the same cooking technique that forms a rack of lamb. The bone is trimmed around the meat and fat so that it looks a lot like a handle.

The beef tomahawk is named after the Native American tomahawk ax. Besides the names we mentioned earlier, it is also called a tomahawk chop steak, bone-in ribeye, and cote du boeuf.

This flavorful steak is extremely soft, tender, and marvelously flavored. The tomahawk is primarily taken from the longissimus dorsi or the longest loin of the beef. It contains the muscle outside the rib cage that runs alongside the spine.

These muscles are rarely used, which makes them extra tender, and contains a decent amount of fat. Once cooked, this intramuscular fat mixes with the gelatin and juices released from the large bone, giving the tomahawk meat its unique flavor and buttery, melt-in-your-mouth texture.

A grilled or smoked tomahawk steak is generally cut into thin slices and served in the shape of the steak. When served with something like mashed potatoes and greens, it makes for the heartiest, most filling meal ever.

How to Grill a Tomahawk Steak: Cook a Tomahawk Steak on a Gas Grill

How to Grill a Tomahawk Steak

This section of the article will show you how to prep a Tomahawk steak on a gas grill. Most Tomahawks are too big and need to be cooked outside on a grill.

Here’s your guide on how to cook a tomahawk steak on a Weber gas grill or something similar.

What You Need:

  • 1 Tomahawk rib-eye steak
  • Kosher salt (to taste)
  • Freshly ground black pepper (to taste)
  • Granulated garlic and paprika (optional)
  • 6-8 cloves of garlic, slightly smashed
  • 4 sprigs of thyme
  • 1 sprig of rosemary
  • Olive oil
  • Half a stick of butter
  • Probe thermometer

Grilling Tomahawk Steaks: The Usual Way

  1. Start by seasoning your steak properly. Sprinkle a liberal amount of salt, pepper, granulated garlic, and the spices of your choice and pat the seasoning into the meat. This will infuse the flavor into the meat and even dry it up a little, giving you a better sear.
  2. Allow your steak to rest at room temperature for about half an hour, letting the seasoning sink into the meat.
  3. Meanwhile, fire up your grill. This will take just 5-10 minutes on a gas grill to reach the desired temperature. If you’re using a charcoal grill, this might take a little extra time to get your fire right.
  4. Set up a 2-zone cooking surface – one side of your grill should be extremely hot, about 500-550F degrees for searing the steak. The other side should be cooler so you can slowly cook the steak to your desired doneness.
  5. Once the searing surface is hot enough, set the steak on the grate and press down.
  6. After 2-3 minutes, turn the steak 45 degrees, without flipping the meat over. Press it down into the grate again, and sear for 2.5 minutes.
  7. After a total of 5 minutes on the first side, flip the tomahawk ribeye steak and repeat the previous step, searing the other side for 5 minutes total with a 45-degree rotation after 2-3 minutes.
  8. Now that the searing is done, move the steak over to the other section of your grill to cook the steak through. Place the steak on a raised rack and insert your meat probe thermometer into the middle of the steak.
  9. In an aluminum or stainless-steel pan, add the butter, garlic clove, and sprigs of rosemary and thyme.  Place the pan on the grill and under the steak to catch drippings from the beef, so that mixes with the butter sauce.
  10. Every 5 minutes, baste the butter sauce mixture in the pan over the steak with a basting brush.
  11. At this point, there is no set cooking time. Grill the steak until it reaches your level of doneness.

    The tomahawk timing is secondary to the internal temperature. If you like steak rare, cook until it reaches 125F. For a medium-rare tomahawk, grill till the internal temperature is 130F.
  12. After the steak reaches the desired temperature, remove the tomahawk from the grill and let it rest for 10-15 minutes, before cutting and serving.

Reverse Searing a Tomahawk Steak on the Grill:

To reverse sear tomahawk steak, you have to cook it through first, and then sear it on the grill.

  1. One hour before cooking, season your thawed steak with lots of salt, pepper, and any seasonings you want.
  2. Set your grill up for indirect high heat. There will be 2 zones on your grill once again; half the grill with direct high heat, and the other half with no heat.
  3. Place the steaks on the grill away from the lit coals, over the indirect heat, with the bone side of the steak facing the heat. Shut the lid, and position the air holes right over the steak.
  4. After ten minutes, flip the steak carefully. After 20 minutes of cooking on indirect heat, when it reaches an internal temperature of 115F (105F for a rare steak) in the thickest part, the steak will be ready to sear.
  5. In the meantime, melt the butter and cook the garlic and herbs in it until fragrant and infused into a sauce.
  6. Shift the meaty part of the steaks right over the coals, with the bone located above the indirect heat zone of the grill.

    Sear the steaks and flip them over every other minute, until it has a brown and crusty surface. From time to time, baste the melted butter over the steak for extra flavor.
  7. Remove the steak from the grill and put it on a very large platter. Let it rest for 10 minutes and then cut it up; run a sharp knife along the curve of the bone to carve the meat from the bone.
  8. Serve the meat alongside the ribs for a bit of a visual treat!

Cooking a Tomahawk Steak in the Oven:

Don’t have a grill? We’ll show you how to cook a tomahawk steak indoors. Make sure you have a large oven, a huge cast-iron skillet, and a big tray that fits in the oven.

[Check out the best warming trays and defrosting trays from our collection]. 

This method is ideal if you’re stumped on how to cook a 3-inch-thick ribeye steak, as the gentle oven heat won’t burn the surface or overcook the meat. It is also suitable for mini tomahawk steaks.

  1. Position a rack in the center of your oven and preheat it to 350F.
  2. Pat your steak with kitchen towels until it is dry and season it well. Let it rest at room temperature for 10-15 minutes.
  3. Prepare the garlic by trimming off the top 1/4 inch of the garlic head.

    Brush with olive oil and add a pinch of salt, then wrap it in foil and roast the garlic for 30 minutes or until the cloves are soft and can be squeezed out. Allow the garlic to cool.
  4. Increase the oven temperature to 425F.
  5. In a large cast-iron skillet, heat the 2 tablespoons olive oil over medium-high heat until it starts smoking. Place the tomahawk steak in the skillet and sear one side for 3 minutes without touching it.
  6. Use tongs and the bone as a handle to turn the steak over and sear the other side for 3 minutes without touching it. Then, for one minute, sear the short side of the steak opposite the bone.

    [Shop for the best tongs for grilling right here].
  7. Move the steak to a rimmed baking tray and put it in the oven, roasting for 9-10 minutes, or until the desired doneness is reached. You can also place the steak on a rack fitted over a baking sheet for improved air circulation and more even cooking.
  8. Measure the steak’s internal temperature; 115F for rare, 125F for medium-rare, and 135F for medium. Remember, the meat continues cooking after it is taken off the heat.
  9. As the steak is cooking, melt the butter in the skillet over low heat. Squeeze the roasted garlic cloves into the butter, crushing and mixing them in with a spatula or wooden spoon. then add the herb sprigs and cook them for an extra 2 minutes.
  10. Once the steak is ready, remove it from the oven, and transfer it back into the skillet. Use a spoon or brush to baste the butter and garlic over the steak. Flip the steak, and baste again for another minute.
  11. Transfer the steak to a cutting board and allow it to rest for 10 minutes, before cutting or carving.

Tomahawk Steak vs. Rib Eye

Rib eye steaks and tomahawks are from the same cut of meat. However, there are still a few of differences between the two:

Rib eye steaks don’t have the signature bone handle. The other major difference is in size.

The tomahawk is cut to the thickness of the rib bone, and is generally about 2 inches thick, and weighs 30-45 ounces. On the other hand, the traditional ribeye is a little smaller.

Besides this, the two have subtle differences in taste and texture.

Any Extra Questions?

01. How Long Do I Cook a Steak on a Charcoal Grill?

For a rare or medium-rare steak, cook each side for 3-5 minutes on each side. For a medium steak, cook for 5-7 minutes, and 8-10 minutes for a well-done steak.

02. Where Can I Find a Tomahawk Steak Near Me?

If you aren’t sure where to buy tomahawk steak cuts from, try any butcher in your locality. You can even order them from online butchers and shops specializing in cuts of meat.

03. What is the Best Temperature to Cook Steak on Grill?

The ideal temperature for steaks is 450°F to 500°F, for thorough and even cooking.

04. What are Some Good Sides Dishes to Serve with Tomahawk Steak?

Side dishes like mashed potatoes, scalloped potatoes, garlic mushrooms, roasted asparagus, or Brussel sprouts look and taste amazing alongside tomahawk steak! You can also add some fresh salad or steamed greens with some rustic bread as well. 

Final Thoughts

If you ever wondered how to make a tomahawk at home, you weren’t the only one. Knowing how to grill a tomahawk steak is a great way to showcase your culinary skills and wow your guests. 

Even if you are just cooking for yourself, this is a steak that you can prepare for any celebratory meal, or just as a treat for yourself. Happy grilling!

How to Cook Ribs on Gas Grill in Foil

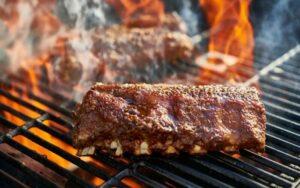
We love grilling, but we aren’t too fond of the 4-6 hour cook time. Who has the patience, especially when you want barbeque ribs on the grill in the immediate future? While the idea of using foil on a grill can seem like an unlikely combo, it speeds things considerably.

In this article, we will show you how to cook ribs on a gas grill. Foil-wrapped ribs actually make some of the softest grilled meats ever, and they are so tender that they fall right off the bone. We will talk about cooking ribs on a gas grill, as well as how to cook ribs on a charcoal grill in foil.

Whether you want to learn how about grilling ribs in foil; whether they are baby back ribs, country-style ribs, and spare ribs. So if you want to know how to grill a rack of ribs in the least time possible, don’t stop reading just yet!

You may also like: Why don’t gas grills use lava rocks anymore?

Cooking Spare Ribs on the Grill

Cooking Spare Ribs

Want to learn how to BBQ ribs on the grill? You won’t ever have to despair over grilling spare ribs with this recipe. You can have juicy, saucy BBQ ribs in no time at all!

What You Need:

  • 4 pounds of spare pork ribs
  • 2 teaspoons of spicy hot pepper sauce
  • 2 tablespoons of marmalade or apricot jam
  • ¾ cup BBQ sauce of your choice

Directions:

  1. Heat your grill to medium-high heat.
  2. Combine the barbecue sauce, marmalade/jam, and pepper sauce until blended.
  3. Put half the ribs in a single layer in the center of a big sheet of heavy-duty foil. Bring up the long sides of foil. Then, seal the foil by double folding both short ends, which leaves the top open.
  4. Add 1/4 cup water (or an ice cube) to the foil packet through the opening at the top. Next, double fold the top to close the packet, leaving space for internal heat circulation.
  5. Repeat these steps with the remaining ribs.
  6. Grill for 45 minutes to 1 hour or until the ribs are done. Remove ribs from foil packets and return them to the grill.
  7. Brush the ribs with the barbecue sauce mixture. Grill for 15 more minutes, turning and brushing with the remaining sauce until the tender ribs on the grill are ready.

Grilling Baby Back Ribs in Foil

Grilled baby back ribs in foil are delicious and ready in time for lunch. They make for a great alternative to slow cooking ribs on a gas grill. For an excellent pork loin back ribs grill recipe, follow these steps:

What You Need:

  • Dry rub in seasoning ribs for grilling:
  • 1 tablespoon salt
  • 2 teaspoons paprika
  • 2 teaspoons granulated garlic
  • 2 teaspoons dried thyme or oregano
  • ½ teaspoon freshly ground black pepper
  • Other ingredients:
  • 2 racks of baby back ribs, 2 to 2½ pounds each
  • 1 cup barbecue sauce of your choice

Directions:

  1. Preheat the grill for direct cooking over medium heat (350° to 450°F).
  2. In a small bowl, combine the dry rub spices and herbs.
  3. Get rid of the membrane from the back of each rack of ribs. Chop each rack crossway in the center to create two smaller, more manageable racks.
  4. Season each half rack heavily with the rub. Use eight 18-by-24-inch pieces of heavy-duty aluminum foil to double wrap each half rack in its own packet.
  5. Place the ribs on the grill over direct heat and grill for 1 hour with the lid closed. From time to time, turn the packets over so they cook evenly, making sure not to stab the foil.
  6. Remove the foil packs from the grill and let rest for about 10 minutes. Carefully remove the ribs, and discard the packets.
  7. Once the wood starts to smoke, return the ribs to the grill, bone side down.
  8. Grill over direct medium heat, with the lid closed for 10 to 12 minutes, until the ribs are sizzling and lightly charred; turning and brushing once or twice with the sauce. You are done cooking baby back ribs on the grill!
  9. Remove the ribs from the grill and rest them for about 5 minutes. Slice the pork rib grill racks into individual ribs and serve warm with any remaining sauce.

Classic Country-Style Quick Ribs on the Grill

Don’t have time for the 2–3-hour pork ribs grilling time? You can make country-style ribs in half the time with this recipe!

What You Need:

  • ¼ cup cider vinegar
  • ¼ cup hot pepper sauce
  • 2 tablespoons Worcestershire sauce
  • ½ cup of BBQ sauce
  • 2 tablespoons prepared yellow mustard
  • 4 pounds country-style pork ribs
  • 1 tablespoon onion powder
  • 1 tablespoon garlic powder
  • 2 pounds of pork ribs

Directions:

  1. Stir the barbeque sauce, cider vinegar, hot pepper sauce, Worcestershire sauce, and mustard together in a bowl until well combined.
  2. Place the ribs in heavy-duty aluminum foil packets; pour the sauce mixture over ribs and coat completely.
  3. Mix the onion powder and garlic powder together in a bowl. Sprinkle over the and let them marinate for 2 hours, turning once to make sure everything is well coated.
  4. Preheat the grill for medium-low heat and lightly oil the grate.
  5. Grill the ribs in foil on the top rack of the gas grill for an hour on medium-low.
  6. After an hour, remove from the foil and baste the ribs with barbeque sauce and grill until the meat is tender, for an extra 15 minutes. Turn the ribs and keep basting with sauce until charred and glossy.

Some Great Tips for Grilling Ribs

Grilling Ribs
  • Modify store-bought sauces with added seasoning and jams for custom favors.
  • Be careful when using tongs to turn the foil packs so that they don’t tear open.
  • Marinate your meat in a dry rub for a more intense taste.
  • Add brown sugar to give your ribs a glossy, caramelized finish and a more classic BBQ flavor profile.
  • Use hickory pellets for a good smoky flavor.
  • Don’t grill on high, stick to medium-low temperature for the softest and most tender meat that slides off the bone.

Frequently Asked Questions

Below you’ll find answers to questions we get asked the most about cooking ribs on the grill.

01. How Long Should I Grill Baby Back Ribs?

When wrapped in foil, ribs need an hour or an hour and 15 minutes to be cooked through. It can take over 2 hours when cooked in a more traditional recipe.

02. What Temperature is the Best to Grill Ribs?

For the best results, grill at 200F or medium-low so that the meat doesn’t overcook and burn.

03. How Long Does It Take to Grill Spare Ribs?

The total cook time for ribs takes around an hour and a half. However, the exact time will depend on the temperature of your grill and the weight of your ribs.

04. How to Grill Ribs on Propane Grill?

To cook ribs on a propane grill, preheat the grill and place the foil-wrapped ribs on the grates and cook for an hour. Then remove from the foil, baste with sauce and cook for an extra 15-20 minutes, turning over to cook evenly.

To End

Grilling ribs is a hobby and cooking method all rolled into one. The process is a labor of love and requires time and patience that not everyone has. 

Knowing how to cook ribs on the gas grill in foil is a great alternative and makes for a quick, yet special meal. Now that you’re all set on fast-track grilling, which one of these recipes will you try first?

How to Cook Bacon on the Grill: Crispy Bacon in Minutes!

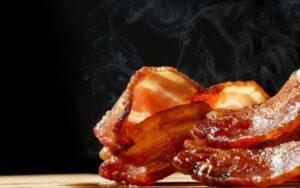
Hate cooking bacon on the stove? Few people fry bacon on a pan and get away unscathed; there are oil splatters and burns and most folks huddle behind their counter to avoid bacon-related injuries.

Since no one is giving up bacon any time soon, we decided to come up with an alternative. Something that reduces the chances of oil splatter burns and chewy bacon. You use this method to cook up a batch of bacon easily when you have guests over or fancy up your breakfasts.

Yup, we’re talking about grilling bacon. If you’re wondering, ‘Can you grill bacon?’ The answer is a resounding yes. Bacon can be grilled for a nice juicy and smoky flavor, with the perfect crispy texture.

If this seems a little over-the-top, stay with us a minute. We will show you how to cook bacon on the grill for unbelievable results and easy cleanup. As a bonus, we will also show you how to cook bacon in a skillet, as well as on a griddle without all the trouble.

Cooking Bacon on the Grill

Cooking Bacon on the Grill

Grilling bacon may be the easiest way to cook bacon. You don’t have to deal with scary grease splattering on your arms, cleanup is easy and the grilling gives an amazing depth of flavor.

What You Need:

  • Outdoor grill
  • Aluminum foil
  • Bacon

Directions:

1.     Put out a double sheet of foil, measured to hold the amount of bacon you want to grill, with the edges turned up to collect the bacon fat.

2.     Place the foil on a sheet pan or baking tray.

3.     Preheat your grill to medium heat (350F-400F).

4.     Place your bacon strips on the foil, making sure they aren’t overlapping.

5.     Place the baking sheet on the grill grate and close the lid.

6.     Cook for 12 minutes or until it reaches your desired level of crunchiness.

7.     Transfer bacon to a plate lined with paper towels to absorb extra grease.

Frying Bacon on the Stove

On a Griddle:

Cooking bacon on the griddle, electric, or otherwise is a good option because the bacon can be laid down flat, which also makes them easier to flip.

That’s not all. Griddles allow you to cook in bulk, and also makes it easy to drain the grease that is rendered from the bacon.

Directions:

1.   Take the bacon out from the fridge at least 15 minutes before cooking.

2.   Place each strip onto a cold electric griddle. Make sure none of the strips are overlapping while fitting as many as possible.

3.   Turn the griddle up to 325F. This is the ideal temp to cook bacon on griddles.

4.   Flip the bacon just once. To check if they need flipping, use tongs to lift a piece slightly and peek under it. If it has browned, turn it over.

5.   The second side doesn’t need as long to cook, so wait a minute or two before killing the heat.

6.   Once the bacon is done, transfer to a plate lined with paper towels to absorb the excess fat.

In a Fry Pan or Skillet:

Although it is the scariest way, it is also the most common way of cooking bacon on the stove. Here’s the best way to fry bacon without any trouble.

Directions:

1.   Start with a cold pan or skillet. Bacon should always start off in a cold pan, so lay out your strips on the pan before turning on the flame. It’s okay to crowd the pan, but try to keep the overlapping to a minimum.

2.   Cook the bacon low and slow. Turn your burner on low and slowly cook the bacon. The bacon will soon start to release some of the fat. When the strips start to curl up, use tongs to loosen the strips and turn them over.

3.   Keep flipping and turning the bacon strips so that they all brown evenly.

4.  Pour off grease carefully. The easiest way to do this is to spoon them off. If you want to pour off the grease, make sure the flame is off and the container you are draining the grease into is heat-proof.

5.  Fry until the bacon is done. This will depend on how crispy and browned you like your bacon.

6. Remove the cooked bacon from the pan and let the extra oil drain off on pieces of paper towels.

Crispy Bacon or Chewy Bacon?

Crispy Bacon

People often debate over the superior sort of bacon. Some love their bacon with a good crunchy texture, while others prefer a softer and chewier slice.

The difference lies in the way the bacon is cooked, and also in the amount of fat in your strips. In crispy bacon, the fat is rendered out completely, giving you a drier texture. On the other hand, chewy bacon contains some of the fat, giving it a moist and meaty mouthfeel.

To make your bacon on the crunchy side, cook the bacon on low heat slowly. This will gradually melt out the fat, giving you that crispy texture. The longer cook time also makes the meat less tender, giving it the signature crunch.

To make chewy bacon, cook the strips at a hotter temperature for a shorter time. A hotter pan will cook the bacon before the fat has the chance to melt out. As a result, the texture will be softer, with chunks of fat.

No matter how you like your bacon, both crispy and chewy strips make for a hearty breakfast of the champions. If you want to experiment, pairing crispy bacon with eggs and chewy ones with pancakes is a great way for both sorts of bacon.

Bacon Cooking Tips

Follow these tips for diner-style bacon that will taste like it was made by a chef!

  • Always start bacon in a cold pan.
  • Drain your bacon afterward to stop them from going soggy or being overly greasy.
  • Wear oven mitts to prevent oil splatter when cooking bacon on a griddle or fry pan.
  • Cook over medium heat, as bacon can burn quickly.
  • Put a little water onto the frypan. This renders the fat, reduces splatter, and results in crispy edges every time.
  • Cook them in the microwave by stacking the bacon on layers of paper towels on a plate. When cooked for 4-6 minutes, the bacon will be done with little cleanup involved!

Frequently Asked Questions

Below you will find answers to questions people often have about cooking bacon.

01. What is the Best Temperature to Cook Bacon?

When grilling or baking bacon, 400F is the best temperature to cook it on. When cooking on a stove, using medium-low heat is the best way to prevent burning or overcooking.

02. Can I Use a Cast Iron Skillet to Cook Bacon?

Using a well-seasoned skillet is perhaps the best way to cook bacon. You will get crispy edges, and be able to spoon out the extra fat with ease. It renders out the fat quickly, giving your bacon an evenly browned surface.

03. Which is Better- Grilling or Frying Bacon?

Grilling bacon results in no oil splatter. It is also a hands-free process and needs minimal cleanup. Best of all, it reduces the amount of shrinkage of your bacon, so there is more to munch on!

04. Can I Add Seasoning to My Bacon?

You can season your bacon with any herbs and spices of your choice. For a more interesting flavor, sprinkle some brown sugar onto the strips. 

This will caramelize and add a complex sweetness to the typical bacon flavor. You can even brush on some maple syrup to glaze your bacon.

05. How Can I Bake Bacon Properly?

Put a rack in the center of a large sheet pan. Place the bacon on top of the rack so they are evenly spaced out and aren’t overlapping. 

Bake at 375°F for 15 minutes, then carefully turn over and bake further until the bacon is fully cooked; golden-brown in color and crisp. This can take around 8 to 10 minutes depending on the thickness of the bacon slices.

So the Point is..

Salty, smoky, meaty. Bacon is the one food that can unite half the world and cure their woes. Whether you like it crispy or chewy, no hearty breakfast is complete without bacon. 

This article shows you how to cook bacon in 3 ways. Knowing how to cook bacon on a grill is the easiest and safest way to get perfectly crispy bacon.

The next time you are having a backyard BBQ, grill up some bacon as an appetizer, or for guests to nibble on along with their sides. You’ll be surprised at how much more bacon you can fit into your meals when you aren’t worried about the cooking process! 

So fire up your grill and start laying out your bacon!

How to Make Summer Sausage: Unlocking the Secrets of Easy Homemade Sausages

Weather warming up? The first days of summer are a great time for making jams, compotes, and preserves! 

But did you know that sweet and fruity goods aren’t the only things you can make and store at home? Have you considered the possibilities of using preserving meat by making sausages at home?

If you have a surplus of meat that you can’t get through, turning them into summer sausage is a scrumptious and money-saving solution. Your meat will last for much longer, and you will have a supply of sausage without needing to run to the store for a new supply every week.

If the prospect of making sausages at home is intimidating, have no fear. We’ve come up with the ultimate smoked summer sausage recipe. Whether you want to smoke homemade sausage or you are considering smoking store-bought sausage, we got you covered.

We will show you how to cook summer sausage in the easiest way possible and provide pointers for making the best-smoked sausage ever. Keep reading and you will learn how to make summer sausage like a pro in no time at all!

You may also like: How to store homemade bread

Summer Sausage 101 : How to Make Summer Sausage?

How to Make Summer Sausage

Summer sausage is an American invention, semi-fermented dry sausage, seasoned with spices and smoked or baked in dry conditions. Depending on the kind and cut of meat used, summer sausage made traditionally can be very flavorful and is great because it isn’t very fatty.

The addition of smoke improves the flavor and also preserves the meat for longer by keeping bacterial activity at bay. Also, the name ‘summer sausage’ refers to the fact the sausages were made in winter and were meant to be eaten during the summer months.

You can smoke summer sausage using pretty much any kind of meat. You can make it from a mix of ground beef and pork, or just ground beef alone. You can try smoking deer sausage and even give an elk summer sausage recipe if you go hunting often.

Equipment Needed for Smoking Summer Sausage

Before you start gathering your ingredients, make sure you have all the equipment you will need:

  • An electric smoker, or any kind of smoker or grill
  • Thermometer
  • Sausage Casings
  • Wood pellets or charcoal
  • Cooking grates or racks
  • Meat grinder
  • Curing mix (Store-bought or made from scratch)

What are the Best Kinds of Sausages to Smoke?

Most cooking experts agree that summer sausages are pretty easy and forgiving to smoke. This means that you can get away with making any kind of summer sausage with most kinds of ground meat and get pretty satisfying results.

That being said, these are the best summer sausages to smoke:

  • Beef sausages (especially those made with chuck)
  • Pork sausages (made from the backside and hindquarters)
  • A mix of beef and pork
  • Venison (the low fat and gaminess translate to a great and flavorful sausage)

If you are particularly adventurous, you can even get deer summer sausage kits and give them a try!

How to Make Smoked Sausages

With these recipes, you will be able to try smoking summer sausage in electric smokers. If you are used to smoking meat on your grill, you can try that as well. 

You can use this recipe to make sausages with almost any kind of meat, so if you want to learn how to make smoked venison summer sausage, give this a read!

Summer Sausage Ingredients:

Here are the things you need for the tastiest summer sausage:

  • 2 pounds of ground meat (You can use plain pork or beef, or a combination of meat for venison and pork summer sausage recipe.

    This also works for smoked beef summer sausage recipe or pork summer sausage recipe. You can get creative, so use any kind of lean meat!)
  • Summer sausage seasoning (Store-bought mixes are fine but you can make your own with a tablespoon of mustard seeds, a teaspoon of garlic and black pepper, and even a touch of coriander powder).
  • ¾ cup of water
  • 2 tablespoons of curing mix, like Morton Tender Quick
  • 1-2 tablespoons of liquid smoke

Making Summer Sausage in an Oven

This is a quick and simple way to prepare summer sausage in an oven, without any smoking or grilling equipment.

  1. In a large bowl, mix the ground beef and water until well blended.
  2. Season with mustard seeds, pepper, garlic powder, curing salt, liquid smoke, and other spices and mix thoroughly. It is best to use your hands for this – like meatloaf.
  3. Shape the mixture into two rolls, and wrap them with aluminum foil. Refrigerate for 24 hours.
  4. Preheat the oven to 350F.
  5. Remove foil from the beef, and poke a couple of holes in the bottom of the meat rolls.
  6. Place them on a roasting rack in a shallow roasting pan to catch the drippings.
  7. Bake for 1 hour, or until the internal temperature reaches 160F.
  8. Cool to room temperature, then wrap in plastic or foil, and refrigerate until cold before slicing and storing.

Making Summer Sausage in a Smoker

sausage-barbeque-smoker-grill-hot-smoked-sausage-food-festival

This recipe is meant for smoking summer sausage in a Masterbuilt electric smoker or something similar.

  1. Mix the water, seasoning, liquid smoke, and curing mix with the ground meat.
  2. Stuff into sausage casings that are around 60mm in diameter.
  3. Leave them at 86F (30C) and 85-90% humidity for 24 hours.
  4. Put the sausages in the smoker and smoke at 110F and 70% humidity for 6 hours. Slowly increase the temperature until the internal temperature of the sausages registers at 140F.
  5. For a drier sausage, dry for 3 days at 60-70F and 65-75%. These steps will make summer sausage more traditionally, and for this reason, the meat needs to be fermented at high humidity for a whole day.

Smoking Store-Bought Sausages:

If you don’t want to go through the trouble of making summer sausage from scratch, you can just buy ground meat and take it from there. You can even buy sausages and smoke them at home, adding flavor and depth to an otherwise plain sausage.

1. Put the fresh sausages next to each other on smoker racks, making sure they are not touching each other.

2. Start up the smoker, using wood briquettes of choice (hickory and maple work very well together). Heat the smoker to a temperature of 250F.

3. Place the sausages in the smoker and smoke them until their internal temperature reaches 150 F. The overall time can differ based on the thickness and size of the sausages. This generally takes from 2.5 to 4 hours.

Recipes Using Summer Sausage:

Summer sausages work well with a cheese platter and eaten with bread and condiments. You can use them in recipes that call for regular sausage. These include sandwiches, meat sauces, pasta, casseroles.

Summer sausages work well with summer-style pasta salads, bruschetta, sliders, and even as toppings for salads and pizzas.

Cook Time and Temperature for Summer Sausage:

Maintaining summer sausage’s internal temp is important as this determines the texture and dryness of the resulting sausage.

Depending on the kind of meat you will need to smoke the meat for 2-3 hours, gradually increasing the temperature.

You need to smoke the sausages until a meat probe or thermometer reads 140-150F for the sausage’s internal temp. The overall smoking sausage time also depends on the kind and cut of meat used.

Frequently Asked Questions

01. Is Summer Sausage Cooked or Raw?

Although summer sausages aren’t cooked in the traditional sense, they aren’t raw either. The combination of heat, smoke, seasoning, and curing mix alters the meat, preserving it, and this ‘cooks’ the meat. As a result, you can eat the sausage as it is, without needing to cook it down.

02. At What Temperature is Sausage Done?

Sausages are generally ready to be taken off the smoker once they reach an internal temperature of 150-165F. To stay on the safe side, smoke until the sausages register 160F on a thermometer so you don’t have to worry about any microbial activity.

03. How Long Do I Have to Smoke Summer Sausage?

This generally depends on the size of your sausages and the cut of meat used. But you need to smoke most summer sausages for 2.5 to 4 hours for them to be properly dried out and infused with the smoke.

04. Do I Have to Cook Summer Sausage?

Summer sausages don’t have to be cooked and you can easily throw some into a sandwich or add it to your cheeseboard to nibble on. At the same time, you can cook them into meat sauces or casseroles, or just fry some up to go with your breakfast eggs.

05. Can I Freeze Summer Sausages?

When summer sausage is stored properly, it can last for 10 months with the best quality. However, even past this time, you can still eat them safely. When smoked properly and stored in airtight packaging, dry summer sausage that is kept frozen at 0°F will be safe to consume indefinitely.

06. What is the Best Pork Sausage Cooking Temperature?

Smoking or grilling temperature should aim for an internal temperature of 160F. You can smoke them at 110F for 6 hours, or at 250F for 2-4 hours.

To Round Off

Traditional summer sausage is a fun project that yields a lot of meat that you can store in the freezer for more than a year. The sausage is a great choice as it is mild, yet flavorful and has just the right amount of fat without being heavy or greasy.

Now that you know how to make summer sausage, the possibilities are endless. Your charcuterie board will have a vibrant and wholesome touch, you have enough breakfast sausages to last forever, and you may never need to resort to store-bought sausages. 

Best of all, you can pack these sausages into cheese, jam, and homemade bread baskets for the most thoughtful gift ever!

Pin Later

Want to give DIY sausages a try? We’ll show you the process of how to make summer sausage.

How to Smoke Cheese: A Beginner’s Guide on Fancying Up Your Cheese

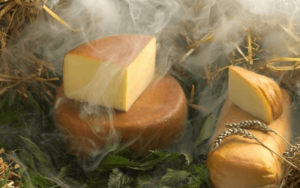
You know and love cheese with all your heart. But are you ready to level up your cheese?

We’re talking about smoked cheeses. These delectable hunks of dairy have a complex flavor brought on by the smokiness and aging that makes them almost irresistible. 

You can add them to charcuterie boards, shred them into sauces, put them in sandwiches, on crackers, or just munch on them as a snack.

The downside? Smoked cheeses can be pretty pricey. Luckily for us, smoking cheese at home is perfectly easy and doable. 

If you have a smoker or grill, knowing how to smoke cheese can save you a ton of money. All you need is a good smoked cheese recipe.

So, how do you smoke cheese? We go into detail about the best cheeses to smoke and walk you through the entire smoking process. Sounds interesting to you? Stick around and find out more!

You may also like: Can you freeze homemade nacho cheese?

What are the Best Cheeses for Smoking?

How to Smoke Cheese

While all smoked cheeses taste great, not all are great for smoking by yourself at home. You need to pick high temperature cheese or something that can hold up at a high temperature without melting.

The best cheeses for smoking are robust ones, like mozzarella, gouda, and pepper jack. You can also smoke cheddar cheese with excellent results. 

The important thing is that your cheese has to be firm. Softer cheeses will crumble and will retain too much of the smoky flavor and can taste acrid.

Homemade cold smokers can be a little unpredictable so you need to err on the side of caution. Solid cheeses will hold onto the right amount of smokiness, which will give them a perfect and complex flavor profile.

It is also important to remember that you shouldn’t use shredded cheese as it will melt in the smoker. Using large blocks will also mute the smoky aspect. 

Instead, cut the cheese into 2 to 4 inch blocks. If you want a mild smoky flavor, keep your blocks of cheese bigger.

What You Need for Smoking Cheese

You might think that smoking cheese requires a lot of sophisticated equipment. If you have a cold smoker, that’s great, but it isn’t the only way to get the job done. You can make a cold smoker box yourself, for just a dollar!

Anyone with a grill or smoker can cold smoke cheese. Here’s what you need to smoke cheese in a smoker or grill (electric or otherwise).

  • Smoker Tube (You can find these on Amazon and most hardware stores; or even make a DIY tube smoker).
  • Any kind of smoker or grill
  • Wood chips or charcoal bricks
  • Parchment or butcher paper
  • Ice
  • Thermometer

You may also like: Best way to freeze American cheese

How to Smoke Cheese

Now let’s get on with the actual smoking process. You can use these steps to smoke cheese in an electric smoker or to smoke cheese on a pellet grill.

Using a Smoking Tube:

  1. Fill your smoke tube with any wood pellets or chips to the brim. Use something mild like apple, cherry, or maple wood for the best flavor.
  2. Take a heat gun and hold it against the pellets on the smoker tube. Do this on your grill or smoker, if you want to smoke cheese on a Traeger or something similar. Set the smoke tube with pellets directly on the grill and then set the heat as it creates flames.
  3. Turn the heat gun on and allow it to set the pellets on fire. They need to catch on fire to allow the pellets to smolder and create smoke.
  4. Put your cheese pieces on a wire rack in your smoker and shut the lid. Allow the cheese to smoke for 2 hours. After an hour, turn the cheese over and then keep smoking for another hour.
  5. The temperature needs to stay at 90F, as anything higher will melt your cheese. This low temperature is why the process is known as cold smoking.
  6. Once the smoking process is complete, remove the cheese from the grill. The flame should be out, with no more smoke coming from the pellets.
  7. Wrap the cheese parchment paper or butcher paper and let label them if needed. Let the cheese rest in your fridge for at least 2 weeks.

    This will age the cheese and give it a more mature taste. If you try eating the cheese before this time, it will taste acrid and gritty.

This process is ideal for smoking cheese in a Masterbuilt electric smoker, and similar models. You can store smoked cheeses like this in the fridge for up to 6 months.

Using a Charcoal Grill:

Want some smoked cheddar cheese? 

High temp cheddar cheese tastes heavenly when smoked and will take your grilled cheese sandwich to new heights. If you haven’t tried smoked mac and cheese Pit Boss-grill style, you don’t know what you’re missing out on.

You can also use this process for pepper jack and gouda adjust the steps to work with propane smoker recipes too. The Little Chief Smoker manual will also make the process much easier.

  1. On one side of the grill, light up around three to six charcoals and allow them mostly to ash over. Then place a handful of wood pellets on top.
  2. Inside the grill, put an aluminum tin full of ice, keeping the grate and cheese as far away as you can from lit charcoal heat sources. For most typical grills, it is best to have the heat source on the right and the ice tin and cheese to the left.
  3. You need to make sure that the temperature does not surpass 90 degrees Fahrenheit. Also, the ice tin should not be placed right over the charcoal fire as this will melt your ice pretty quickly.
  4. Once the coals are lit and the wood chips are placed on top, quickly put the aluminum tin and place your cheeses on the grate. Keep enough room between cheese chunks to allow the smoke to circulate easily.
  5. Close the dome of the grill quickly and let the system smoke. In case the smoke dies down after the first 20 or 30 minutes, just add one or two more unlit charcoal briquettes and another fistful of wood, which will give you another 20 or 30 minutes of cold smoking.
  6. You may need to add or remove charcoal depending on how your grill or smoker works. Just remember to keep the temperature at 90F.
  7. Around halfway through the smoking process, turn the cheeses on the grate, moving them front to back and flipping the blocks over.
  8. If you want your cheese to have a pronounced smokiness, smoke them for 3-4 hours. If you want a milder level of smoke, you can limit it to one or two hours.

Tips for the Best Smoked Cheese

If you’re smoking cheese for the first time, you might feel unprepared. These tips will make sure your cheese tastes just like the stuff from the store!

  • Freeze your cheese for 2 hours before smoking, after cutting them into blocks. This further prevents the cheese from melting and allows the smoke to infuse into the cheese evenly.
  • Position the grill grate above the lower grate and put the cheese off on the side of the smoke.
  • For better smoke dispersal on all sides, turn over the cheese pieces every 30 minutes.
  • Monitor the thermometer constantly to keep the temperature at 85 to 90F.
  • Smaller cheese pieces equal a larger surface area and more exposure to the smoke.

Any Other Questions?

Below, you will find answers to questions people often have about smoking cheese.

01. How Long Should I Smoke My Cheese?

For a slight to average smokiness, smoke the cheese for 1-2 hours. If you want a more intense smoky flavor, you can smoke them for 3 or even 4 hours.

02. How to Store Smoked Cheeses and Keep Them Fresh?

After the two weeks in the fridge are up, take out your cheese from the parchment paper. Allow them to breathe a little and then place them in vacuum-sealed bags. 

If you don’t have a vacuum sealer, place them in Ziploc bags and push out as much air as you can. Then, you can keep them in the fridge or a pantry in cool weather.

03. What is the Best Wood for Smoking Cheese?

Mild flavored wood is the best for smoking cheese. These include apple, maple, cherry, peach, and pearwood.

04. How Long Can Cheddar Cheese Sit Out?

Hard cheeses like cheddar can sit out for around 8 hours without melting, crumbling, or going bad.

05. How to Use a Smoke Tube?

To use a smoke tube, fill it up with wood chips or pellets. Use a heat gun or torch to light them on fire, and allow the pellets to start producing smoke.

Final Thoughts

Adding smoked cheese to recipes that call for regular cheese is the easiest way to jazz up basic recipes. Once you know how to smoke cheese, you can save lots of money as you won’t have to buy overpriced ones. The process is fairly easy and won’t even take up much time!

If you want a fun weekend project that yields delicious results, give DIY smoked cheeses a shot. Top your salad with cubes of smoked cheese. Make yourself an extra-special BLT. 

But don’t just keep your smoked to yourself. Next time you put together a cheese platter for your guests, watch their shock when you reveal you smoked the cheese yourself!

Pin Later

Store-bought smoked cheese too pricey for your budget? We’ll show you how to smoke cheese at home.

Why Don’t Gas Grills Use Lava Rocks Anymore?

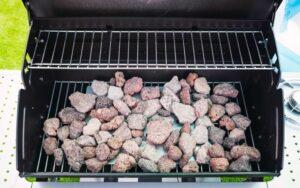
Remember the time when all the built-in gas grills came with their own set of lava rocks? Those days are gone. Now you can hardly find lava rocks in any grills. Ever wonder why we all just stopped using them?

There is no doubt that lava rocks are amazing at creating the most delicious smoked briskets and stakes. They are a natural ingredient that seems like a better environmental choice as well. So why don’t gas grills use lava rocks anymore? 

Before we find out the answer, let’s take a look at what lava rocks really are.

What are Lava Rocks?

Why Don’t Gas Grills Use Lava Rocks

The name itself is pretty self-explanatory. Lava rocks are a type of volcanic rock that is found after volcanic eruptions. 

Once the lava cools down, they turn into these hard pieces of rocks that can retain tons of heat. For this reason, they have been used for baking and grilling for centuries. 

As they are formed through the solidification of molten lava, they are very porous in nature. These stones are super durable and strong. Lava rocks can retain tons of heat too. And why wouldn’t they? They are born from magma!

Why Were Lava Rocks Used in Gas Grills?

Lava rocks can hold a lot of heat compared to any other type of rock. They heat up very fast and can reflect heat from a propane grill. This makes barbecuing very easy. 

Traditionally, lava rocks were used on gas grills. As they get super heated-up, when the fat from the meat drops down into them, it creates smoke and adds a rich flavor to the food. Lava rock cooking was a really popular way to grill different types of meat and veggies.

The smokiness you get from lava rocks is very intense and unique. They make any type of meat super delicious. This is the reason why it was so popular to use. However, using them for gas grills was no easy task.

Why Don’t Gas Grills Use Lava Rocks Anymore?

Gas Grills Use Lava Rocks

Modern technologies have created better alternatives and inventions that make grilling very easy and fast so we don’t need to use lava rocks anymore. Apart from that, lava rocks have their own set of drawbacks that makes us not want to go back to them. 

Health Concerns:

If you are someone who loves to barbecue very frequently, using a gas grill with lava rocks can result in serious food poisoning. This is because the stones can harbor bacteria and even mold. 

The appeal of lava rocks is the smokiness you get from using them on any type of meat. This happens because the meat drippings and fat falls straight into the hot rocks and forms smoke. The smoke flavors the meat. 

As much tasty as the meat gets, the bacteria and molds inside the rocks tend to come into contact with the meat as well. So not only are you getting a roasted flavor, but you also get exposed to many different health risks with it. 

Most people develop serious stomach issues. So instead people now use gas grill ceramic briquettes. We will talk about them in a moment.

Hygiene Issues:

You might be wondering why bacteria or mold would grow on lava rock grills. Well, this is due to the nature of the grill itself. 

In modern gas grills, all the fat drips into a tray. As lava rocks are very porous, the drippings get absorbed by the stones. 

So even after burning the rocks for hours, there is still moisture and fat left on them. What happens when moisture and fat get exposed to open air? They start to get moldy. 

This problem would be easily avoided if we could clean the lava rocks after each use. But cleaning them is not an easy task as you can not use any liquids. Not even water is allowed to clean lava rocks. 

And even if you do, there needs to be a long drying process before you can use them to their full glory again. Who wants to do so much work only to make a few hamburgers? 

Excess Smoke:

You can imagine the number of smoke lava rock BBQ grills would produce when grease starts to drop on its burning flames. The specialty of lava rocks is their charred flavor which is achieved through excessive exposure to smoke. 

This is all fun and game until you are the one who has to grill the meat. Not only would you start to cough uncontrollably, but regular exposure to that amount of smoke can cause serious lung damage.

Are Lava Rocks That Bad?

Lava Rocks That Bad

Not really. Lava rocks are still used for many different things. As we have mentioned before, they are porous. This is a disadvantage when you are trying to cook with them. 

Lava rocks for gas grill might be out for their porous quality, but this very feature makes them lightweight and easy to move around. 

Lava rocks are also very inexpensive compared to other alternatives. This is one of the reasons why they grew so popular in the first place. 

But the key thing that attracted everyone toward hot rock cookers is their high smoke level. This adds a gorgeous smokiness to any type of meat you are grilling. The distinctive flavor is very hard to recreate with anything else. 

Lava rock grills are also super good at longer heat retention. This means you can check up on your food without worrying about any heat escaping.

Better Alternatives of Lava Rocks 

At this point you might be thinking, I will just use charcoal then. Not trying to discourage you but charcoal is not ideal for gas grills. We have two very effective alternatives to lava rocks for you:

Ceramic Briquettes:

Ceramic Briquettes

Ceramic briquettes are a very popular and probably the most used alternative to lava rocks. They are made out of ceramic using the latest technology. 

As this is a manmade item, all the briquettes have the same shape and size. This provides a uniform look which results in better heat distribution. Gas grill ceramic briquettes have totally replaced lava rocks.

There are many advantages of using ceramic briquettes for gas grills. Some of the key ones are:

  • As ceramic briquettes evenly distribute heat throughout your grill, it saves a lot of energy. So it is fuel-saving by design. 
  • Ceramic briquettes add delicious flavors to your food. The aroma is very smoky and quite similar to lava rocks. 
  • The cleanup is one of the biggest advantages of ceramic briquettes. You can use a brush to simply remove all the debris from it.
  • It adds the same flavor profiles as lava rocks without any of those health concerns. 
  • You rarely need to replace your ceramic briquettes. They can easily last 5-6 years before they start to show signs of wear. Even lava rocks do not last that long!

To us, this is the obvious choice for anyone who is looking for a perfect replacement without losing any taste and flavors. Ceramic briquettes provide just that.

Heat Shields:

If you are someone who is more of a low maintenance kind of person, it is probably a better idea to look for heat shields or flavor grids for your gas grill. 

Heat shields are a type of metal tent that protects the burner from grease and meat drippings. It also helps to disperse heat more evenly. This makes them very useful if you’re new at grilling. 

Some of the key advantages of heat shields include:

  • They are very easy to clean. Simple soap and water would do the trick.
  • They are quite lightweight compared to lava rocks and ceramic briquettes. So you can easily carry it around. 
  • In case one part gets damaged, you can replace the whole thing very easily as they are not very expensive.

However, one drawback is that heat shields are not very long-lasting. Ceramic briquettes last years and years without any issues. But these shields are not ideal if you happen to grill very frequently.

To Finish 

Now that you know how risky lava rocks can be for grilling, hopefully, you will not go back to the old-fashioned style anymore. As amazing as this material is, the risk exceeds the benefits.  

It’s no wonder why gas grills don’t use lava rocks anymore! Besides, there are so many better alternatives, we can not see a reason why anyone would try them again.

Pin Later

Why Don’t Gas Grills Use Lava Rocks Anymore?