If you’re lazy like me, there’s a good chance you left your coffeemaker’s tanks full of water, resulting in a stale cup of coffee that tastes like bog water.
Or you forgot to empty out your Keurig 2.0 before leaving for the weekend, and the water froze in the cold.
Either way, knowing how to empty Keurig 2.0 internal tank would have prevented these snafus. And if the idea of dumping out water from your prized coffee maker makes you nervous, you’re not the only one.
Emptying a Keurig water tank the wrong way can wreck the appliance.
Instead, this article will show you how to drain Keurig properly, and in different ways. If you want to learn how to drain Keurig for storage or deep cleaning, this article is the right place to start.
Meet the Keurig 2.0
Before we begin, you must know how your Keurig 2.0 works. This will make sure you know how it is supposed to work and identify the different parts when needed. To start off, this Keurig is a slender and compact appliance that offers 9 brew sizes.
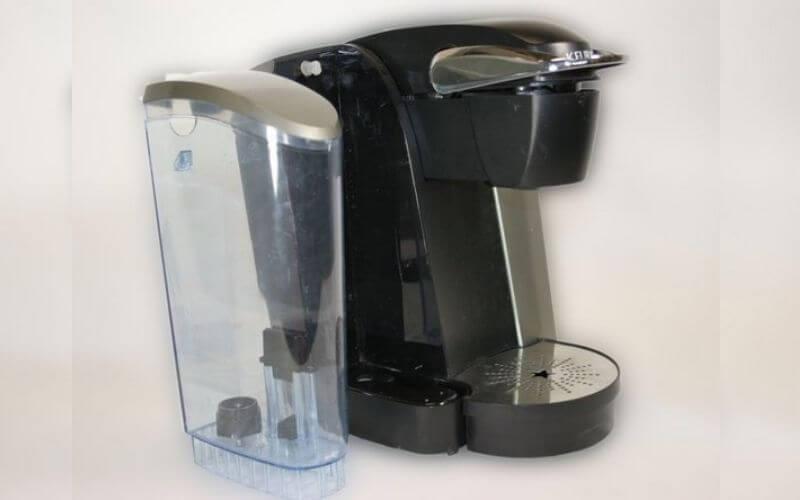
Also, the Keurig water reservoir can hold 40 ounces of water. It is removable which makes it easier to clean and empty. However, when the appliance is in use, the water is carried from the external tank to an internal one for brewing, and emptying out water from the inside is harder.
This coffee machine has a black and white touch display, which allows you to select brew strength and other options. It is a quick coffee maker and is great for those always on the run. Best of all, you can make both hot and iced coffee with a Keurig.
How long can you leave water in Keurig?
Although it is said that you can store water in your Keurig for 3-4 days safely, any water leftover a day will result in a weak brew that tastes old and stale.
Because of this, knowing how to get water out of Keurig will ensure you always have a fresh-tasting cup of joe.
Why you need to empty the Keurig 2.0 internal tank
The Keurig 2.0 coffee maker is a popular choice for many coffee lovers, but over time, the internal tank can collect mineral buildup and impurities that can affect the quality of your coffee. This is why it’s important to empty the internal tank regularly, as it helps to maintain the quality of your coffee and keeps your coffee maker in top condition.
If the internal tank is not emptied, several problems can arise. The first issue is the buildup of mineral deposits in the tank, which can affect the taste of your coffee. Mineral deposits can make your coffee taste bitter or metallic, and in some cases, it can affect the performance of your coffee maker. If you notice a change in the taste of your coffee or your coffee maker is not working as well as it used to, it may be time to empty the internal tank.
Another problem that can arise from not emptying the internal tank is the growth of mold and bacteria. The internal tank can be a breeding ground for bacteria and mold, especially if it is not cleaned regularly. This can pose a health risk to you and your family, especially if you have a weakened immune system or suffer from allergies or asthma.
In addition, not emptying the internal tank can also cause the machine to become clogged or damaged. Mineral buildup and impurities can cause blockages in the machine, which can prevent water from flowing through the coffee maker. This can cause the machine to overheat or malfunction, which can be costly to repair.
How to Empty a Keurig Tank

This section of the article will tell you how to drain Keurig 2.0 for storage and cleaning. You can go about emptying your Keurig’s tank in two ways.
One method requires no disassembly or tools, while the other calls for Keurig 2.0 K200 disassembly.
Regardless of which method you choose to follow, here’s how to empty water from Keurig coffee makers without any damage to your appliance.
Keurig Drain Brewer Method Without Disassembly:
01. Empty the water tank:
This method ‘tricks’ the Keurig to think the reservoir is full of water so that it begins brewing. It will then allow the Keurig to drain all the water stored in the internal water tank.
02. Adjust the float in the external reservoir:
You will be able to see the message ‘Prime’ shown on the display once the machine has completed brewing. This message will tell you that the tank of the Keurig is empty. At this point, your Keurig 2.0 won’t pump water.
Adjust this float after you have emptied the water tank. Inside the tank, there is a metal disk on one side near the bottom. This metal disk is meant to regulate the amount of water that is still in the reservoir.
The floating magnet should be pulled till it reaches the top of its track. Then, push it a little to fix it in place. Place the lid of the reservoir back on
03. Allow the Keurig to start brewing:
To begin brewing, press the brew button. Set a cup under the spout before you do so.
Don’t put a coffee pod since you are draining the machine, not making a cup of coffee. Your cup or carafe will catch the remnants of water that is drained out of the machine.
04. Wait for the “Prime” display:
Once the machine’s display says ‘Prime,” then the brewing process is completed. If the machine tells you to add more water, repeat the procedure. The display should say “Prime” once the second brewing is done.
It means that your brewer is completely drained. This ‘Keurig no water’ sign means that you can store your machine, or fill it with fresh water.
Keurig Draining Method through Disassembly
01. Pull the handle of the pod compartment and then remove the screws:
In this method, you can’t access the water tank through the bottom of the coffee maker. Instead, the top section will be removed to access the top of the water tank directly.
There are two screws that need to be loosened first. Use a flat-head screwdriver to remove both screws.
Once this is done, you can then remove the top area of your Keurig. This section of the coffeemaker will read ‘Keurig’ on the front.
02. Remove the top of the coffeemaker:
The loosened top should then be gently lifted forward and upward. This exposes the inner tubing of the coffee maker.
03. Remove the silicone tubes from the internal reservoir:
The inside of the Keurig will have two tubes connected to the top of the internal reservoir.
One is shaped like an L and faces sideways. The other comes straight out of the top. Loosen the zip ties to remove the tubes. You can hold on to the zip ties with needle-nose pliers and shake to loosen them and slide them off.
04. Empty the water out by inverting the machine:
To pour water out of the L-shaped opening, upend the brewer. This can take quite some time.
To speed things up, you can place a thin straw over the opening of the detached tube on top of the water tank. This improves airflow in the tube, speeding up the draining process.
You must drain the tubes until there is no water left in the tank.
05. Reassemble the coffeemaker:
Reattach the silicone tubes after the draining is complete. If you simply loosened the zip ties down, you can just wiggle them back up to secure the tubes. Then put the Keurig back together.
This method also shows you how to drain a Keurig K40 coffee maker.
Common Issues and Solutions
Coffee tastes bad
If your coffee has a strange taste, it could be due to mineral buildup or impurities in the internal tank. Empty and clean the internal tank using the steps outlined in this article.
Slow brewing or low water flow
If your Keurig 2.0 coffee maker is taking longer to brew coffee than usual, or the water flow seems weak, the internal tank may be clogged with mineral buildup. Empty and clean the internal tank, then descale the machine using a descaling solution.
Internal tank not filling up
If the internal tank is not filling up with water, it could be due to a malfunctioning heating element or water pump. Check that the machine is properly plugged in, and try resetting the machine by unplugging it for a few minutes before plugging it back in.
Internal tank leaking
If you notice water leaking from the internal tank, it could be due to a cracked or damaged tank. Check the tank for cracks or damage, and replace the tank if necessary.
Internal tank overflows
If the internal tank is overfilling, it could be due to a malfunctioning water level sensor. Try resetting the machine, or contact Keurig customer service for further assistance.
Have More Questions?
Here you will find answers to questions people have about emptying their Keurig 2.0.
01. What Should I Do if My Keurig Won’t Pump Water from Reservoir?
If your Keurig won’t pump water through, you can try turning it off, letting it rest a few minutes, and then turning it on again. If that doesn’t work, empty out the tank and descale the coffeemaker and clean the needle.
02. Why Does My Keurig Say Add Water but It is Full?
In case this happens, you need to wait for the water in your tank to cool down, or empty the reservoir and start from scratch.
Learn more about troubleshooting your Keurig here.
03. How to Clean Keurig Water Reservoir?
If you have a removable tank, take it out and clean it with some mild dish soap and a sponge. For deeper cleaning, mix equal parts water and vinegar and rub a brewing cycle with this solution, followed by a cycle of freshwater.
04. What Can I Do if There is No Water Coming Out of Keurig Coffeemaker?
This issue has a simple fix: cleaning the needle of your Keurig. If that doesn’t work, try descaling your coffee maker and giving it a thorough cleaning.
Closing Thoughts
A malfunctioning coffeemaker can inspire a tantrum early in the morning, but restarting your Keurig is a much easier option. Whether you want to fix your coffeemaker, you just want to throw out the water you filled it with 3 days ago, this article will come in handy for you.
Once you know how to empty Keurig 2.0 internal tank, you can enjoy a great-tasting cup of joe any time of the day.


