The outdoor beckons, your gear is all packed, and the thought of setting up the perfect campsite gets your heart racing. There’s something incredibly rewarding about waking up to the golden glow of sunrise, with chirping birds for background score and the rich, intoxicating scent of freshly percolated coffee beckoning from the campfire. That’s what camping is all about!
In this comprehensive guide, we are going to focus on percolated coffee – the archetypal outdoor brew that has seen keen enthusiasts and casual sippers alike fall unequivocally in love with its robust and timeless flavor. I’m John Bird, a certified coffee brewer and an outdoors enthusiast, and today I will take you on a coffee brewing journey, one stovetop percolator at a time.
Understanding Percolated Coffee
Brewing coffee via a stovetop percolator holds a certain rustic charm. An age-old technique, it results in coffee brimming with a distinct character and boldness of flavor that machine-made coffee can often miss.
The secret lies in how water reincarnates through the coffee grounds multiple times, extracting a more profound flavor with each cycle. This recurrent brewing elicits an earthy, slightly bitter, full-bodied coffee which can be exceptionally satisfying.
This old-school technique negates the need for fancy equipment, offering a sensory journey from the beginning of the brewing process till the brew percolates, creating an alluring coffee scent that is strongly reminiscent of that good old nostalgia.
Choosing the Right Percolator
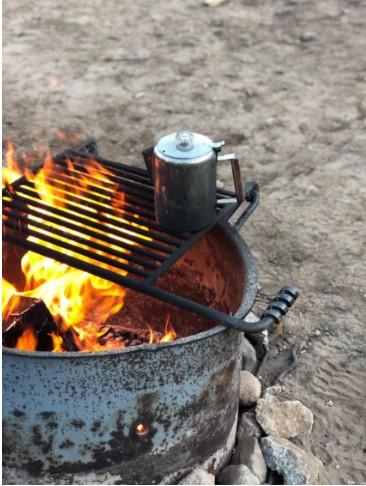
When it comes to brewing hearty camping coffee, the charm of a percolator is unbeatable. A wide variety of percolator models exist, but simplicity, durability, and brew quality are key when picking the right one for camping purposes. Pro tip from my experience: go for a stovetop percolator.
Easy to use and ride the old-world charm wave, it allows complete control over the brewing process. Besides, it’s designed to perfectly suit an outdoor setup where you could either be using a campfire, stove, or a mini burner. Practical to the core, I fondly remember my first rendezvous with a steel stovetop percolator and the heavenly coffee it brewed. I knew then that it was a boon for my camping escapades.
A Step-by-Step Guide: Brewing Coffee on a Stovetop Percolator
The art-science blend that encompasses brewing coffee on a stovetop percolator is indeed mesmerizing. From picking the best beans and controlling heat to understanding flavors and nailing the brewing time, it’s all about orchestrating a symphony that results in a perfect cup of coffee.
Let me take you through this exciting process.
| Step | Description |
|---|---|
| Selecting the Coffee | – Use high-grade coffee beans with bold flavors (hints of chocolate or caramel). – Opt for a medium-coarse grind for ideal water permeability and optimal flavor extraction. |
| Preparing the Percolator | – Fill the pod with water up to the indicated level. – Place coffee grounds in their basket without packing them too tight. |
| Heating | – Start with medium heat. – Increase temperature until water begins to bubble, then reduce to a simmer. – Monitor closely to avoid under-brewing or over-extracting. |
| Observing the Percolation | – Watch the transparent glass knob for the first droplets. – Ensure a steady rhythm of bubbles for a rich percolated brew. |
| About Brewing Time | – Aim for 7 to 10 minutes of brewing. – Adjust based on taste preferences and avoid over-brewing. |
| Adjusting Heat | – Regulate heat to maintain the right water temperature. – Watch for signs like steam or changing percolating rhythm to adjust the temperature. |
| Removing from Heat | – Once brewing time is up, remove the percolator from the heat. – Wait for the bubbling sounds to subside. |
| Removing Grounds and Serving | – Remove the coffee basket. – Pour the coffee into a mug and enjoy. |
Selecting the Coffee:
The first cog in the wheel to a top-notch camping coffee is high-grade coffee beans. Bold flavors laced with hints of chocolate or caramel are often a good fit for a percolator’s output. Do ensure a medium-coarse grind that allows ideal water permeability and optimal flavor extraction. Relying on my experiments, it’s the medium-coarse grind that consistently delivers a ‘spot-on’ percolated coffee.
Preparing the Percolator:
A stovetop percolator has a unique setup process — fill the pod with water up to the indicated level, rest the coffee grounds in their dedicated basket, but be sure to not pack them too tight. Water must be able to percolate freely through the grounds to extract the finest flavor. The mental picture of it brewing over a campfire, filling the air with intoxicating aroma certainly adds to the brewing excitement!
Heating:
Start with a medium heat, gradually escalating the water temperature till it begins to bubble in the glass top, then reduce the heat to a simmer. This control lets you extract all the flavors from the coffee grounds. Too low, and the coffee might be under-brewed; too high, and you may end up with an over-extracted bitter brew. So, keep a close check!
Observing the Percolation:
Percolation is where all the magic unfolds. As the percolator works its charm over the campfire and the first droplets make their way into the transparent glass knob, the brewing process is well on its way. Each bubble commencing a new brewing cycle helping the coffee to mature into a rich percolated brew. Just ensure a steady rhythm and not an overheated one.
About Brewing Time:
Seven to ten minutes of brewing time is usually a good starting point. However, feel free to adjust based on your taste preferences. Just ensure not to over-brew to avoid a disheartening bitter aftertaste. Trust me, learning the art of perfect brewing time doesn’t come without mistakes; it’s all part of your camp stove coffee brewing experience.
Adjusting Heat:
Regulating heat to maintain the right water temperature is an art worth perfecting. While the percolator fills the air with a mesmerizing scent, steam or changing percolating rhythm could indicate the need to adjust the temperature. Takes a few trials and errors, but once you’ve got a knack for it, there is no looking back.
Removing from Heat:
Once your brewing time is up, take the percolator off the heat and let the ebbing bubbling sounds usher in an era of quiet. What follows next is the moment we have been awaiting eagerly – the pour!
Removing Grounds and Serving:
The final steps are all about enjoying the fruition of your meticulous efforts. Remove the coffee basket, pour the coffee into your treasured camping mug and indulge in the first sip of pure paradise. Enjoy the triumph of having brewed a distinctive coffee outdoors while you soak in the visual splendor around.
Conclusion:
Brewing coffee in a stovetop percolator is decidedly an experience unlike any other – a synesthetic combination of science, art, and nostalgia manifested through a beautiful process that promises a distinctive cup of Joe. Most importantly, it elevates your camping experience, warms up the camping conversations and forges beautiful memories.
As we wrap up, here’s a heartfelt shoutout to all outdoor enthusiasts, coffee aficionados, campers, and hikers — I look forward to hearing about your coffee brewing tales, the ‘Eureka’ moments, the camp stories, and everything in between.
So, next time you’re on a camping trip, don’t forget your percolator and embrace the art of perfect percolated coffee brewing with arms wide open. I assure you, it’s an adventure worth pursuing!
Safe travels and happy brewing, folks!
FAQs
What is ‘percolated coffee’?
Percolated coffee refers to a brewing process where hot water circulates through coffee grounds multiple times, extracting deep flavors at each pass. It’s a traditional method that often delivers a robust, full-bodied coffee, typified by its slightly bitter and earthy tones.
Why is stovetop percolating considered ideal for camping?
A stovetop percolator is an ideal choice to brew coffee while camping due to its simplicity, durability, and the ability to operate without electricity. It can brew directly on a campfire, stove, or a mini burner. Also, it gives users complete control over the brewing process, from temperature adjustments to brewing time.
How long does it take to brew coffee using a stovetop percolator?
The brewing time for stovetop percolating generally falls between 7-10 minutes. However, this can be adjusted according to one’s preference for coffee strength. Brewing for too long might result in a bitter aftertaste, while under-brewing could give a weak and underwhelming coffee.
Is it necessary to use freshly ground coffee for percolating?
While it’s not absolutely essential, using freshly ground coffee in a percolator does improve the quality of the brew. Fresh grounds have more flavor and aroma to offer compared to pre-packaged or old coffee, resulting in a more flavorful and satisfying cup of coffee.
What kind of coffee grind is best for percolating?
A medium-coarse grind is generally considered ideal for percolating. It’s coarse enough for water to permeate through it without over-extracting the flavors, which could happen with a finer grind. It is also not too coarse to under-extract and result in a weak brew.
Is percolated coffee stronger than drip coffee?
Percolated coffee is generally stronger and more robust in flavor compared to drip coffee. The repeated cycling of water through the grounds in a percolator yields a brew with more depth. However, the strength greatly depends on the brewing duration and the type of coffee beans used.
Do I need any specific equipment to brew coffee with a percolator?
Aside from the stovetop percolator itself, no additional equipment is necessary. However, for optimal results, freshly ground coffee beans and quality water are recommended. Of course, a heat source such as a campfire, stove, or burner is needed for outdoor brewing.
