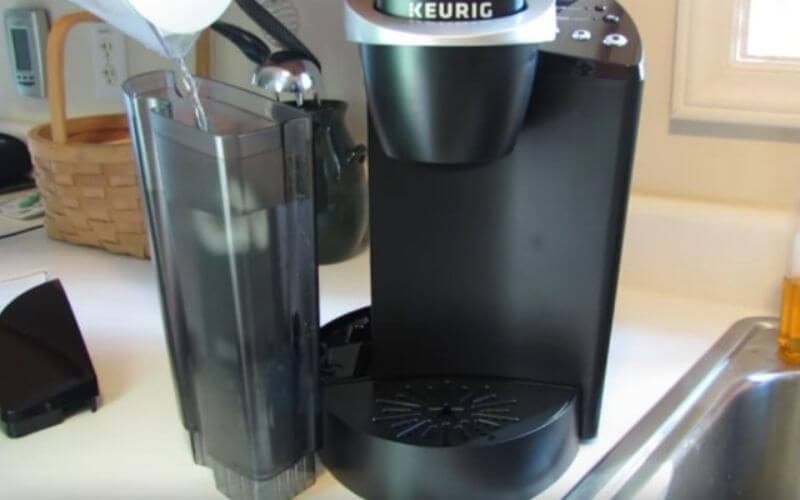
As a long-time barista, I’ve brewed my share of piping hot cups over the years. And when my own trusty Keurig kaps out at home, I feel that desperate, coffee-less panic creep in. But this caffeine-craving chef knows a trick or two for troubleshooting!
I’ll never forget the fateful day last year when my trusty Keurig K55 started flashing cryptic error codes instead of brewing my precious morning elixir. After some frenzied Googling and digging through manuals, I realized there was a clog in the intake tube filter from mineral buildup.
Some meticulous dismantling and cleaning later, I nursed my beloved brewer back to perfect health! You can read more about diagnosing mysterious coffee maker error codes on this CoffeeFolk blog.
While I may not have the European flair of Nespresso or high-tech specs of Breville’s spaceship appliances, this barista can strategically diagnose those frustrating Keurig errors and degunk with the best of ‘em. Consider yours truly your personal coffee coach!
Inside this fun yet practical guide, you’ll discover my foolproof troubleshooting advice from embarrassingly simple to ingeniously unconventional fixes. Apply these customized tips to resuscitate your K-Supreme or wake your K-Classic from its caffeine-less coma!

☕️🛠️ Keurig Troubleshooting Quick Guide
| Issue | Possible Cause | Solution |
| Not brewing | Unplugged | Check power connections |
| Won’t turn on | Power button jammed | Carefully loosen button |
| Leaking water | Misaligned water reservoir | Reposition reservoir |
| Weak coffee | Clogged filter basket | Clean/replace filters |
| Flashing lights | Descale needed | Run descaling solution |
🔍Troubleshooting Guide: Decode the Coffee Conundrums
As any coffee kitchen alchemist knows, desperate times call for Caffeinated measures. When your brewer starts acting up, stay calm and break out your homemade barista bat-belt! We’ll confront these coffee crises with gusto.
First up in our troubleshooting training, let’s start simple and investigate the…
☕️Coffee Catastrophe Basics: Oopsie-Daisy Disasters
We’ve all been there – stumbling half-asleep to our precious coffee pot, only to be cruelly doused with…nothing. Just sad silence from our suddenly stubborn steamer. Before you panic, let’s break down the blunders of coffee calamity 101:
| Troubleshooting Step | Action | Note |
|---|---|---|
| Check Power Connection | Make sure the brewer is plugged in. | A common oversight with an easy fix. |
| Power Button Check | Press the power button firmly but gently. | Power button location varies by model; consult the manual. |
| Test the Outlet | Use another device to test the outlet. | Determines if the issue is with the brewer or the power supply. |
| Morning Blurry-Eye Syndrome Check | Double-check all actions taken. | Simple mistakes are more common when half-asleep. |
- Is it even on?? Make sure your brewer is securely plugged into the wall. I know it seems silly, but with blurry morning eyes those squints at the outlet can betray. Take a second look! My neighbor Jason once urgently called me to investigate why his Keurig K-Slim had mysteriously stopped working. After 20 minutes disassembling and scrutinizing internal parts, I noticed the power cord plug lying askew on the counter… Whoops!
- While you’re checking cords, firmly prod the power button on the back or top right of your machine model. Consult manuals if unsure – location varies! Be assertive but gentle, coaxing your machine to gurgle to life.
- If lights stay dark, grab a nearby device and plug it into the same outlet. Did someone forget to pay the electric bill or is there a sneaky wiring issue? Better sort that before diagnosis continues!
Have no fear mistaking these morning mishaps for full-on equipment expiry. Once solved, you can revel in the amusing realization that your java genie was indeed ok, just a bit…clueless without caffeinated guidance!
💁🏻♂️Intermediate Interventions: Strategic Troubleshooting
Alright, no silly slip-ups with buttons or plugs. Time to get down to some strategic problem-solving! When your brewer starts playing games, don’t get mad – get investigating! Here are some sneaky issues that may be thwarting that magical caffeine flow:
- Water Woes: Lift the lid of your water reservoir and peer down intensely. Is there enough fluid in there to brew the divine nectar? Check the fill line – you need to play by the rules!While inspecting H2O levels, ensure the reservoir is seated properly in place.
- Overzealous cleaning can bump it out of alignment. Shove it decisively back into position with authority!Feeling lazy? If there’s questionable grime in your water tank, do like I once did in college and toss in a handful of uncooked rice then swish vigorously to scrub those walls! Gets the job done in a pinch.
- Filter Fiascos: Mineral deposits from water can clog up filters over time. Lift out the water filter cage and inspect closely. See any scale, residue, or debris? Rinse clean or plop in a fresh filter.
- Descale or Die: The dreaded descaling demon! Mineral buildup is no joke, coating your machine’s innards with crusty calcium obstacles. Combat scaling with descaling solutions or good ol’ white vinegar. Follow instructions closely – then flush thoroughly.
Now, let’s organize this information into a table for clarity:
| Issue | What to Look For | Solution |
|---|---|---|
| Water Woes | – Not enough water in the reservoir.- Reservoir not seated properly. | – Ensure the fill line is met. – Realign the reservoir. – Use uncooked rice for cleaning. |
| Filter Fiascos | – Scale, residue, or debris in the filter. | – Rinse the filter or replace it. |
| Descale or Die | – Mineral buildup inside the machine. | – Use descaling solution or white vinegar. – Follow descaling instructions and flush thoroughly. |
Advanced Alchemy: Become the Brewer Whisperer

Uh oh, you’ve tried all the usual troubleshooting tricks but your brewer still won’t brew. Before you rage quit coffee forever, break out your artisan brewer decoder ring! Let’s confront those cryptic flashing lights and error codes to revive your finicky machine.
I’ll never forget the time my roommate Daisy’s Keurig K-Compact started violently flashing red. After consulting coffee machine technician expertise on typical causes, I studied the advanced manuals for her exact model number.
A-ha, those 7 ominous flashes indicated a bad thermal fuse! With some masterful dissembling, cleaning out trapped grounds, and installing a replacement fuse, I single-handedly defeated the despicable descaling demon and freed that fateful brewer from the error code time loop it was trapped in!
When your brewer starts angrily blinking like a Vesuvian discotheque, don’t freak – get researching! Each brand has a special diagnostic language to understand. Once decoded, you can strategize targeted fixes.
Scan model numbers, then head online to access official manuals…
And here’s a simple table format to organize the troubleshooting steps mentioned:
| Step | Action | Purpose |
|---|---|---|
| 1 | Identify flashing lights or error codes | Understand the issue |
| 2 | Consult advanced manuals for specific model number | Find exact cause |
| 3 | Disassemble and clean out trapped grounds | Clear any blockages |
| 4 | Replace bad thermal fuse | Repair the hardware issue |
| 5 | Decode the diagnostic language of the brand | Strategize fixes |
| 6 | Access official manuals online | Get detailed instructions |
🌿Brew an Eco-Friendly Cup
Want to lighten your environmental impact while delighting your tastebuds? As a proud partner with Grounds for Change coffee company, I’m excited to offer readers an exclusive 15% off your first order of their carbon-neutral, Fair Trade certified coffee pods!
Experience the smooth, guilt-free flavor that only shade-grown, bird-friendly beans can deliver while aligning with your values. Support sustainable coffee farmers with every aromatic cup.
Brew your favorite roast in a reusable pod to reduce waste even further! Check out these handy resources for responsibly disposing of traditional K-Cups:
- Keurig® Recycling Program
- K-Cup Recycling Guide
And be sure to compost those grounds to nurture your garden or houseplants! Let’s nourish our bodies and the planet, one conscious cup at a time.
And here’s a table summarizing the key points and resources for a clearer presentation:
| Key Point | Description | Resource |
|---|---|---|
| Exclusive Discount | 15% off first order of carbon-neutral, Fair Trade coffee pods. | Grounds for Change |
| Environmental Benefits | Shade-grown, bird-friendly beans. Sustainable farming support. | |
| Waste Reduction | Use of reusable pods. | |
| Responsible Disposal | Guides for recycling traditional K-Cups. | Keurig® Recycling Program, K-Cup Recycling Guide |
| Composting | Encouragement to compost used coffee grounds. |
🎉 Customer Service
You have most probably busted the spooky Keurig trouble by now, but if you could not, then the problem with your device is more complicated. It is a great idea to call Customer Care and let the manufacturer have a look. They are just a call away.
📞 Contact Information
Dial the toll-free number 1-866-901-BREW (2739) to reach Keurig Support.
🎁 Bonus Just For You
Don’t worry; here is a bonus just for you — Some of the best K-cups coffee makers!
Have a happy coffee day! ☕
FAQs
How do you reset a Keurig that won’t turn on?
If your Keurig won’t power on, try unplugging from the power outlet for 30 seconds, then firmly plug back in. Press the POWER button on top to turn it back on. This resets the machine. If still not turning on, inspect the plug connections, try another outlet.
What causes a Keurig to not turn on?
Common reasons a Keurig won’t turn on include unplugged cord, loose plug connections, faulty outlet, stuck Power button, or internal fuse/wiring issues. Check each part systematically to determine root cause. Don’t immediately assume device is broken.
Why is my Keurig suddenly not working?
If a previously functioning Keurig stops working, suspect water flow blockages like k-cups jammed in chambers or inlet needles clogged from mineral buildup. Descale buildup inside lines. Check reservoir alignment. Inspect all parts involved in brew process.
When I press the button on my Keurig nothing happens?
If Power button doesn’t respond, unplug and firmly reconnect cord. Still unresponsive? Gently pry around edges of button in case internal mechanisms are jammed. Contact Keurig if button is damaged.
How long do Keurigs last?
With proper maintenance like descaling, cleaning, using filtered water, Keurigs can last 5-7 years depending on model. Budget models average 2-3 years lifespans. Quality and care are key for longevity!
How do you tell if your Keurig is clogged?
Signs of clogged Keurig include weak coffee output, full pods not puncturing, leaking water from machine, odd noises, and error codes. Inspect inlet needles and chambers for grounds trapped around entry points blocking water flow.


